Fighting with a Dragon (Part 1) Guide

Main Story
Fighting with a Dragon (Part 1) Quest Summary
Mint invites the Appraiser to her new apartment to play 999 Nights, an anomaly board game, with her coworkers Iroi and Shinku. The dice pull them into the game itself, where they're assigned RPG classes and meet a village of Fuzzies fleeing the Crimson Dragon. After earning the Fuzzies' trust through quests, they learn of a legendary Dragon Armor scattered across three locations and set out to reclaim it, defeating the Molten Dragon at the Chocolate Volcano and the Frostspike Dragon at the Milk Ice Mountain along the way. As they adventure, Shinku struggles with insecurity over her inability to fight and her mysterious Esper powers, which she's reluctant to use.
Fighting with a Dragon (Part 1) Walkthrough
Guide for Advanced Hunters: You must complete the quest "Dreamwalk Corridor"
1st Main Objective: Play 999 Nights
[1] Return to Eibon

Head to the backyard of Eibon to trigger the start of the story.

A cutscene shows a chronology of the game, with Chapter 7 being skipped entirely. Afterward, Mint texts you about wanting to play a game with the now-awake Nanally at her new apartment.

Approach Nanally at the other end of the yard. Before she can sneak out, Adler catches her and insists she continue resting. Nanally concedes and asks you to have fun on her behalf. Adler then sends you off with a gift for Mint.
[2] Travel to Mint's Apartment Building

Travel to Mint's Apartment Building at the New Herland district. It's very close to the Wertheimer Tower of New Herland. She'll be waiting for you outside.

You'll be playing 999 Nights, an Anomaly Board Game that can create Custom Stories. It's Mint's ultimate icebreaker, having already played it with Units 4 and 6. Now she wants to introduce it to her new coworkers.
[3] Enter her Apartment

Head to Mint's Apartment on the ninth floor. You can take the stairs or use the elevator.

Once you reach the ninth floor, her apartment is the last one at the end of the hallway.

Mint will introduce you to her new teammates. Iroi, who you met at Sunward Island, and Shinku, the newest member.

The game begins when Mint has Shinku roll the dice, causing the board to transform and pull everyone inside.
[4] March Forward

A cutscene plays, and you'll find out you've been given the "Swordsman" class. Iroi has the "Mage" class, and Mint has the "Barbarian" class. Shinku for some reason, has the "Commoner" class, and Mint realizes it's because everyone was auto-assigned classes because she didn't teach anyone how to make characters.

You're also introduced to the "Dice Lord", the anomaly narrating the game. It uses the voices of different players and will occasionally interject observations to them.

Once you regain control, follow the path until you encounter a Fuzzy.
[5] Follow the Fuzzy

This Fuzzy is the Elder Fuzzy's grandchild, so follow him to learn more about the world.
[6] Talk with the Elder Fuzzy

Find the Elder Fuzzy in the middle of the plaza.

It seems the Fuzzies were the original settlers of the land, but then they were forced to flee to this small village by the Crimson Dragon. He also invites the Party to hear about the previous heroine, who seems to resemble Shinku.
[7] Leave the Fuzzy Village

Mint decides slaying the Dragon should be the party's first goal, so head for the village exit. Unfortunately, the Roadblock Fuzzy refuses to move, making Mint realize they must first return and hear the Elder Fuzzy's story.
[8] Return to the Elder Fuzzy

Return to the Elder Fuzzy and hear the rest of his story.

He speaks of the Dragon Armor, which the heroine used to fight the Crimson Dragon. After the battle, she disappeared and the 4 pieces were scattered. The Crimson Dragon holds one, and the other 3 are still missing.

That's all he knows for now. Before you leave, he gives you a mysterious chest that will open at an important moment and directs you to the Mysterious Fuzzy Merchant.
[9] Listen to what the Fuzzies have to say

Go to two Fuzzies who are gossiping to learn more about the merchant.
[10] Talk to the Mysterious Fuzzy Merchant

The Mysterious Fuzzy Merchant bids guests to come ask for wares, but strangely seems to be ignoring you entirely.

The Dice Lord explains it's because you're not "esteemed, and that we should return when we're at Level 3.
[11] Check the Quest Board

Three quests are available on the Quest Board, and the group discusses which one to take. In the end, Shinku decides they'll accept all three, starting with the snack thieves.
[12] Deal with the Bubblehogs

Defeat the Bubblehogs to complete the quest. Afterward, you'll receive a tutorial on equipping items.

Since this is your first combat quest, here's a quick overview of each character's role: The Appraiser is great for single target damage and his skill is great for dodging, Mint has great AoE damage and crowd control moves, and Iroi is ranged, debuffs enemies, and can heal with her ultimate. Unfortunately, Shinku can only use her one skill and cannot equip items yet.
[13] Return to the Quest Board

With that quest complete, you're now well on your way to reaching Level 3.
[14] Talk to Fuzzies with lost items.
Now we must help the Fuzzies of the village who have lost their items.
| Fuzzy | Location |
|---|---|
| Claimant Fuzzy |  This Fuzzy has lost the walking sticks his parents gave him when he was younger. He isn't sure where they went, but points you toward another Fuzzy who's also missing something. This Fuzzy has lost the walking sticks his parents gave him when he was younger. He isn't sure where they went, but points you toward another Fuzzy who's also missing something. |
| Artist Fuzzy |  The Artist Fuzzy has lost his clay, leaving him unable to create any artwork. Since lost belongings seem to be a common problem in the village, your next lead is the Crafts Fuzzy. The Artist Fuzzy has lost his clay, leaving him unable to create any artwork. Since lost belongings seem to be a common problem in the village, your next lead is the Crafts Fuzzy. |
| Maintenance Fuzzy |  The Maintenance Fuzzy explains that the Brawly Fuzzy took his glue. Given how these side quests work, it's safe to assume the missing clay and walking sticks are there as well. The Maintenance Fuzzy explains that the Brawly Fuzzy took his glue. Given how these side quests work, it's safe to assume the missing clay and walking sticks are there as well. |
[15] Find the Brawly Fuzzy

The Brawly Fuzzy admits he took the items because the others wouldn't share with him. However, he's already used them to build a Fuzzy sculpture, leaving nothing to return.

Realizing he's also the fuzzy looking for a challenger, Shinku decides to face him in battle.
[16] Spar with the Brawly Fuzzy

The Brawly Fuzzy isn't much of a threat. Stay aggressive to keep him staggered and launch him into the air.
[17] Talk to the Brawly Fuzzy

Rather than getting upset, the Fuzzies are impressed by what the Brawly Fuzzy created from their belongings and thank him for it. They also thank your group for helping recover their missing items.
[18] Report Back to the Quest Board

Return once more to the Quest Board, and submit the quests. The rewards are enough to bring everyone to Level 3, except Shinku, whose Commoner class requires even more experience.

At that moment, the mysterious chest opens to reveal a candy that grants one level. Despite Shinku's protests, Mint gives it to her, allowing the group to finally visit the Mysterious Fuzzy Merchant.
[19] Talk to the Mysterious Fuzzy Merchant

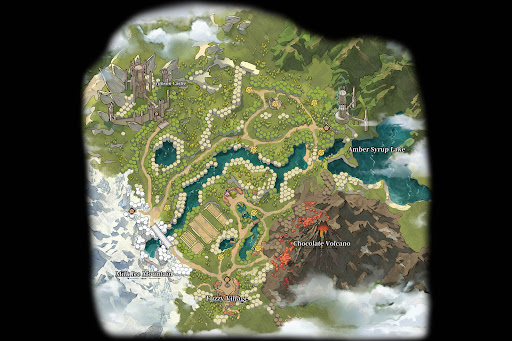
The Fuzzy Merchant tells you where you need to go before you even ask, making everyone except Mint suspicious. You're to go search for the Dragon Armor pieces at the Scorching Chocolate Volcano, the Freezing Milk Ice Mountain, and the Illusory Amber Syrup Lake.
[20] Leave the Fuzzy Village

Head to the village exit. The roadblock is finally gone, allowing you to continue your adventure.
2nd Main Objective: Go to the Chocolate Volcano
[1] Travel to the Chocolate Volcano

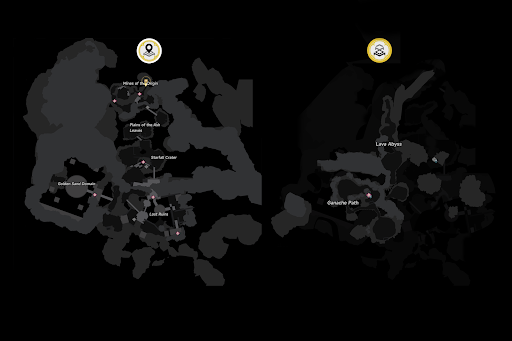
The Chocolate Volcano is on the southeast side of the map. This walkthrough focuses on the main route through this dungeon and the other 3. There will be enemy encounters in between sections, and this guide will only point out standout enemy encounters.
[2] Interact with the Bonfire

These bonfires act as fast travel points and let you rest. You can also identify high-level equipment and salvage unwanted gear for Warren Coins.
[3] Defeat the Shadow Fuzzies

Stay on the marked route while defeating enemies as you progress. Make sure to go to the waypoint locations exactly so that the path will update properly.W hile you're here, consider enabling Auto Pickup in the Inventory menu so you don't have to manually collect dropped items.
[4] Defeat the Monsters

Take out 5 monsters. You can stay and defeat more if you want to earn extra EXP.
[5] Open the Chest

Open the chest so you can continue exploring.
[6] Keep Exploring

Throughout the dungeons in this mode, you'll come across optional side paths leading to treasure chests. This guide will focus mainly on following the main routes. Use our Chocolate Volcano map to find out where these chests are!

From this bonfire, continue along the main route while defeating the monsters ahead.

Beyond the open area, climb the stairs and cross the bridge into the Plains of the Ash Leaves.
[7] Explore the Plains of the Ash Leaves

Activate the bonfire, then cross the two bridges ahead.

On the second island, drop to the lower level and continue along the marked route.
[8] Continue Through the Starfall Crater

At the next bonfire, enter into the cave to the left. Defeat all the monsters and continue towards the next waypoints.

Beyond the fifth bonfire, you'll encounter a powerful Shadow Fuzzy. Ignore it and head right to leave the cave.

Make sure to go around the cliff, as it's easy to miss the waypoint. The screenshot above shows how easy it is to overlook it. If that happens, you'll need to backtrack through every waypoint in the dungeon before the objective updates.
[9] Explore the Lost Ruins

Cross the giant bridge to reach another bonfire, where you'll also find the Mysterious Fuzzy Merchant. Stock up on recovery items and buffs before moving on.

The next area contains a Blazhorn Tiger miniboss. Defeat the smaller enemies first so they don't interrupt the fight.

Once the enemies are defeated, climb the stairs on the left and continue toward the next waypoint.

The eighth bonfire is at the end of the path. From there, turn right and continue toward the next waypoint.

Another bonfire awaits at the top of the bridge.

The next room contains another Blazhorn Tiger alongside several smaller enemies. You can defeat them all or simply run past them to reach the elevator.

Once at the elevator, step on the central platform to make it rise.
[10] Fight the Molten Dragon

When you arrive at the top, head across the bridge to our final bonfire at the Golden Sand Domain. Alongside the bonfire are 3 mercenary fuzzies, costing 33,000, 66,000, and 99,000 Warren Coins to hire. If you want to hire them, make sure to make your choice count, as you can only hire one of them.

The Molten Dragon starts the fight by diving to the middle. The boss has 4 attacks that are dangerous.
| Attack | How to Dodge it |
|---|---|
| Ground Slam |  The Molten Dragon will slam down and cause a shockwave of lava, eventually ending with a eruption of pillars a small distance away. It's better to stick closer and jump to the Molten Dragon to avoid the flames. The Molten Dragon will slam down and cause a shockwave of lava, eventually ending with a eruption of pillars a small distance away. It's better to stick closer and jump to the Molten Dragon to avoid the flames. |
| Lava Jump |  The Molten Dragon Dives underground and then jumps up to attack you. Listen to the rumbling so you can dodge it. The Molten Dragon Dives underground and then jumps up to attack you. Listen to the rumbling so you can dodge it. |
| Ramming Charge |  The Molten Dragon will charge at you when you're close by, leaving molten lava in its path. Dodge to the side to avoid it. The Molten Dragon will charge at you when you're close by, leaving molten lava in its path. Dodge to the side to avoid it. |
| Death Roll |  The Molten Dragon will roll to the side, spewing lava everywhere. Dodge away from the Dragon to avoid these attacks. The Molten Dragon will roll to the side, spewing lava everywhere. Dodge away from the Dragon to avoid these attacks. |
[11] Return to Camp and talk to the Team

After defeating the boss, return to camp. You can fast travel there using the map or walk there manually. It's located in the middle of the world map.

While the party relaxes, the Mysterious Fuzzy Merchant arrives to sell her wares. If you ever need to restock or sell equipment, the Camp will always have a guaranteed shop.
3rd Main Objective: Go to the Milk Ice Mountain
[1] Go to the Milk Ice Mountain

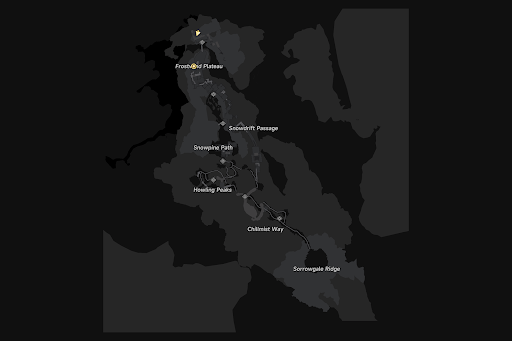
Milk Ice Mountain is at the South West of the map. Make sure to be at least level 15, as that's the required level to enter. You can return to Chocolate Volcano to grind against enemies if you need to.
[2] Explore the Frostwind Plateau

Head to the first bonfire, then cross the bridge to the castle ruins. You won't need to defeat every monster along the way. Use our Milk Ice Mountain map to track down any optional chests.

Inside the castle ruins, follow the hallways until you reach a staircase on the left, then head downstairs.

Jump off the platform into an open area. If you defeat the monsters here, a chest will spawn in the middle.

Ride the elevator at the end of the passage.

At the bottom is the 2nd bonfire of the dungeon. The path to the next bonfire is simple, but full of monsters. There's also a Fuzzy nearby that you can talk to so you can it guide to its camp.

Another bonfire sits midway through the path, giving you a checkpoint before the upcoming miniboss.

The Icehorn Tiger fights the same as the Blazhorn Tiger, so you shouldn't have trouble anticipating its attacks.

Once inside the castle ruins, climb either staircase to reach the elevator. The lower route leads to additional chests if you'd like to collect them.
[3] Explore the Snowpine Paths

The fourth Bonfire also welcomes back the Mysterious Fuzzy Merchant for your item-related needs.

In the first crossroads, turn right and enter the cave.

At the cave crossroads, take the right path to the elevator.
[4] Explore the Howling Peaks and Chilmist Way

At the top of the elevator you'll find the fifth bonfire.

Now for this part, you can choose to skip the miniboss. When you exit the cave, there will be a ridge that leads to two different paths.

The right path has the second Icehorn Tiger.

If you instead take the left path across the ice bridge, the miniboss is skipped entirely.

Cross the first ice bridge, then continue along the trail to a second bridge. From there, enter the small cave.

The small cave exits to the sixth bonfire.

From here, the path will be a simple straight line to the finish.

At the end of Chilmist Way is the final bonfire before the boss. Beyond it, you'll fight through one last group of frozen monsters before meeting the Mercenary Fuzzies outside the boss arena.
[5] Defeat the Frostspike Dragon

The Frostspike Dragon starts the battle bursting out of an ice crystal and flying. It has two phases. Flying and Grounded. Here are the most dangerous attacks it can do while flying.
| Attack | How to Dodge it |
|---|---|
| Tail Jab |  The Frostspike Dragon coils back its tail and then jabs it at a high speed. Dodge forward so the narrow tail misses you. The Frostspike Dragon coils back its tail and then jabs it at a high speed. Dodge forward so the narrow tail misses you. |
| Wing Attacks |  The Frostspike Dragon Dives attacks once with its right and left wing, and then both. Stay by the tail to avoid the attack entirely. The Frostspike Dragon Dives attacks once with its right and left wing, and then both. Stay by the tail to avoid the attack entirely. |
| Flying Headbutt |  The Frostspike Dragon coats its head in ice and rams towards you. Dodge to the side to avoid it. The Frostspike Dragon coats its head in ice and rams towards you. Dodge to the side to avoid it. |
| Freeze Breath |  The Frostspike Dragon breathes frost at you. Stay underneath it to avoid damage. The Frostspike Dragon breathes frost at you. Stay underneath it to avoid damage. |
| Landing Crash |  The Frostspike Dragon flies high in the air then launches to the ground at high speeds with a freezing crash. Dodge to the side to avoid this attack. The Frostspike Dragon flies high in the air then launches to the ground at high speeds with a freezing crash. Dodge to the side to avoid this attack. |
When it's on the ground, the Dragon will only have two moves. A wide tail swipe, and a roaring frost breath. Because the Dragon is very slow, you can easily deal with him by attacking it from behind or from its sides. If you defeat it fast enough it won't be able to shift back to its flying phase.
[6] Talk to the Others

With the Frostspike Dragon defeated, it's time to return to camp and speak to the others.

Shinku is saddened by her inability to contribute in fights. Mint tells her she can rely on the others instead and asks what her Esper abilities are, but Shinku says she doesn't want to use them unless she has to.
Fighting with a Dragon (Part 1) Reward
・Mind Shard - Zero
・Hunter Level EXP x 2000
・Annulith x 120
・Expansion Core x 20
・Elite Hunter Guide x 30
・Fons x 200000
・Beetle Coin x 500000
・Chaotic Dye x 30
・Hetrogeneous Unit x 50