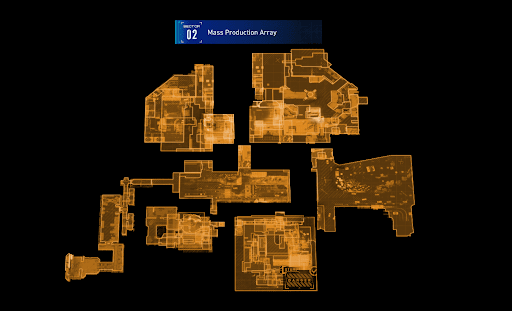
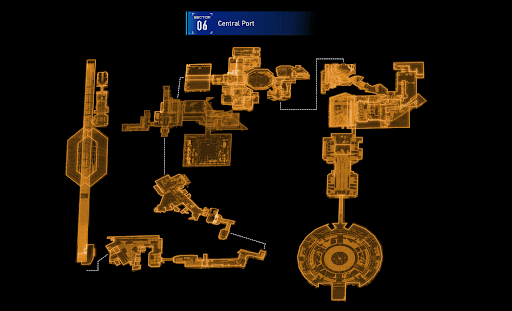
Sector 02: Mass Production Array - Side Alley Guide

Main Story
Sector 02: Mass Production Array - Side Alley Quest Summary
Hugh and Diana continue to explore the Mass Production Array in search of the remaining Beacons. Their next destination is called the Side Alley!
Sector 02: Mass Production Array - Side Alley Walkthrough
Main Objective: Contact Earth from the Comms Tower.
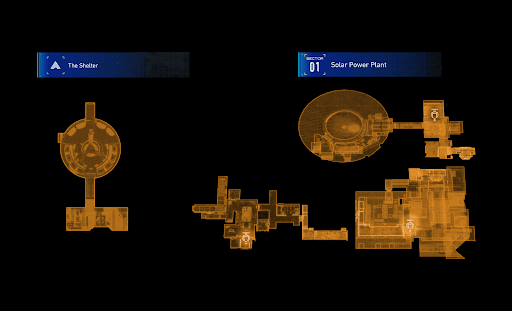
AREA 03 - Side Alley
Players may take a quick break to resupply at the Shelter by using the Interconnecting Passage Escape Hatch before starting the exploration of the Side Alley block.

Current Sub-Objective: Unlock the Massive Gate & Hack the Beacons.
Many beacons remain to be hacked, with two located in this block! To progress, Hugh and Diana must drop down from the building to the street level.

| Point of Interest | Details |
|---|---|
| Charge Piercer |  A weapon can be picked up beside the door. A powerful Attack Unit that fires armor-piercing rounds. When charged, its power and piercing effects dramatically increase. Unaffected by range, it excels at striking from afar. |
Eliminate the set of Watchers waiting to attack beyond the door.

The struggle continues as the Executor, an enemy first encountered at the Test Site Entrance, appears again here. The only difference now is that they have to battle one here.

| No. | How to Defeat an Executor |
|---|---|
| 1 |  These robots can quickly close distance despite their size. Maintain a safe distance to stay clear of their grasp and AoE slams. |
| 2 |  Prepare to dodge when the bot drops to all fours to avoid its rapid charge attack. |
| 3 |  Once Diana completes the hack, Hugh should target the blue cooling rods on the Executor's back for maximum damage. |
| 4 |  Whenever the enemy jams hacking attempts with red blocks, Hugh should target the antennas on the droid's face to disable the skill. |
Continue ahead and hack the Red Panel on the wall and climb using the lowered platform.

| Point of Interest | Details |
|---|---|
| Relay Amplifier Mod |  After jumping on the blue-and-white platform and defeating the nearby Watcher, there's a Blue Chest on the right corner by the fence. Effect: Increases hacking range by 30%. |
Keep climbing the platforms until a building's roof with orange-and-white fences is reached. Drop from that location to find the path leading to the third Beacon.

| Point of Interest | Details |
|---|---|
| Beacon 3 |   Cross another set of platforms and defeat enemies along the way to reach this area. |
After the beacon is hacked, there are three more to find. As Hugh says, the glass is half full.

| Point of Interest | Details |
|---|---|
| Long-range Targeting Mod |   Drop down from the third Beacon and defeat the bots on the street. Directly below the Beacon, another mod is available to loot. Effect: Increases attack power by 10% when the enemy is over 20 meters away. |
| Sweeper Bot |  Climb the nearby ramp to find a Sweeper Bot in the alley. These small flying robots flee once a player approaches them. Defeating one unlocks the You’re Not Getting Away That Easy Trophy. |
| Slide Read Earth Memory |  Take the lift near the Sweeper Bot to find a REM by the wire mesh. "There's a reason this humble playground fixture is always a hit. It may be simple, but that doesn't make it any less fun. It also serves as a great secret hideout." |
It is time to locate the fourth Beacon after grabbing these collectibles! Backtrack to Beacon 3, then jump over to the next building.

| Point of Interest | Details |
|---|---|
| Upgrade Component 1 |  Found next to a tree. |
| Mini Cabin Buddy 1 |  After taking the zipline lift, a Mini Cabin Buddy can be spotted on top of a truck from afar. |
| Safe Box 1 |  Drop from the same ledge to open a Safe Box containing a Cabin Coin. |
| Nourishment for the Soul Holo |  Ride the zipline lift again and head inside the room. Next, interact with this holo to hear a conversation between Hugh and Diana about food and its deeper significance beyond basic human nutrients. |
Upon exiting the room, the fourth Beacon comes into view. Prepare for the ambush that IDUS will set up before dropping into the area below.

| No. | How to Clear the Beacon 4 Challenge |
|---|---|
| 1 |  The first set of enemies includes two Walkers and several Watchers that can launch missiles. |
| 2 |  For the second wave, this challenge is taken up a notch! An Executor will appear along with the Walker and Watcher bots. |
| 3 |  Cancel the Lockdown Mode by hacking the Beacon 4. |
Another beacon down! Hugh asks if Diana is having fun, and she appears both satisfied and determined to see it through by his side.

| Point of Interest | Details |
|---|---|
| Upgrade Component 2 | Before moving on, make sure to grab a hidden Upgrade Component from the side area of the roof. |

Enter the next door to reach the Business District block.
| Note |
|---|
| For a complete list of Collectibles in the Mass Production Array, use our Guide! |