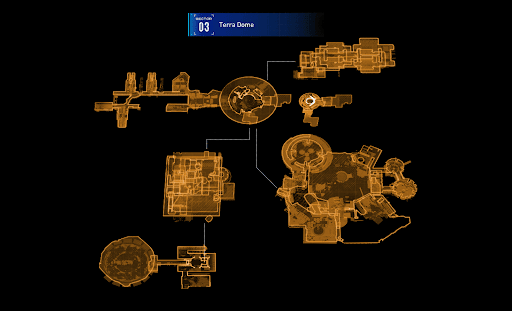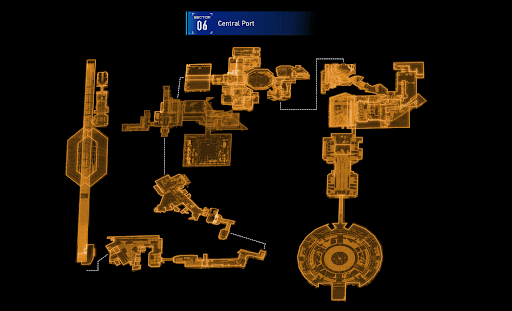


Sector 03: Terra Dome - Soil Research Guide

Main Story
Sector 03: Terra Dome - Soil Research Quest Summary
A beach is found at The Cradle's Terra Dome! Even if it is only a recreation, Hugh and Diana take the time to enjoy the scenery. They then investigate the Soil Research block to search for the Underground Lim Regulator to set Eight free.
Sector 03: Terra Dome - Soil Research Walkthrough
Main Objective: Help Eight.
AREA 04 - Soil Research
Speaking with Eight unlocks the Soil Research block. Use the Central Lift Escape Hatch to recharge at the Shelter or continue directly with the mission.

Current Sub-Objective: Find the Underground Lim Regulator.
Pass through another door to encounter a fork in the path. Collect an item first and turn left.

| Point of Interest | Details |
|---|---|
| Safe Box 1 |  At the end of the right path, there is a Safe Box with a Cabin Coin inside. |
Keep walking and head outside, where Hugh and Diana find a recreation of a beach.

Diana is fascinated by the artificial sea, while Hugh feels nostalgic for the real ocean near his home.

He tells Diana that everything will make sense when she sees the real thing. There, the two promise that Diana will return with Hugh to his home, Earth.

Once the cutscene is over, take some time to explore. Remove the Filament Mass nearby to discover a hidden room.

| Point of Interest | Details |
|---|---|
| Training Data |  Located in the right corner of the dark room. Additional data left over on a Training Simulation terminal. The data will be sent to the Shelter to be managed by Cabin. |
| Routine Check Report File |  On top of a computer desk next to the Training Data. |
| Upgrade Component 1 |  Zipline back to the beach and check behind the large boulder for this item. |
After collecting them, head inside the next area to progress.

As much as it annoys Hugh, another Locked Door blocks the way forward. A total of four locks must be disabled.

| Point of Interest | Details |
|---|---|
| Red Panel 01 |  The first panel is found beside the Locked Door. |
| Red Panel 02 |  A second terminal is on the left side of the door. Be careful of the Watchers here. |
Go through the tunnel afterward to reach a lab.

The third panel is close by, but watch out for a surprise attack from a new bot known as the Creeper!
| No. | Tips on How to Defeat a Creeper |
|---|---|
| 1 |  The new threat is camouflaged and may be difficult to spot. Observe closely to see its body slowly approaching Hugh and Diana. |
| 2 |  Quickly shoot the enemy and dodge the grab attack to break its cloak. If they fail, Diana can save Hugh by completing a hacking sequence. |
| 3 |  While it's still visible, make the time count and trap it using a Stasis Net. Fire on its weak point until it is defeated. |
With the invisible robot now gone, Hugh and Diana can continue.
| Point of Interest | Details |
|---|---|
| Red Panel 03 |  Hack the terminal in this lab once it is safe to do so. |
| Photon Laser |  Go past the next door to see a new weapon by the elevator. A powerful Attack Unit that shoots a concentrated photon beam. Mobility is reduced while firing but its damage increases the longer the beam is sustained. |
Only one lock remains before Hugh and Diana can open the door.

Use the Elevator to reach the upper area.

Expect a group of bots (1 Impeder and 2 Watchers) waiting up here.

| Point of Interest | Details |
|---|---|
| Mini Cabin Buddy 1 |  Peek-a-boo! A small creature has been watching the whole fight from a tree branch. After defeating the three enemies, look to the side to find a Mini Cabin. |
Turn right and head inside the room. There's a Bomber and Walker guarding the fourth terminal at the end of the hall.

| Point of Interest | Details |
|---|---|
| Red Panel 04 |  After defeating the enemies, hack the last panel. |
All locks are disabled! The two of them can return downstairs after collecting a few more items.

| Point of Interest | Details |
|---|---|
| Safe Box 2 |  On the opposite side of the hall, open the Safe Box to get three Upgrade Components. Keep in mind that a Creeper is nearby. |
| Safe Box 3 |  Starting from Red Panel 04, turn left and drop down outside. There's a hidden Safe Box here. |
Once ready, return to the unlocked door on the lower ground.

SUB-AREA - GeoScience Lab
| Point of Interest | Details |
|---|---|
| GeoScience Lab Station Escape Hatch & Signal Interference Protection Guidance |  These are immediately visible upon entering the room. |
Take the elevator next to the signage to go down and stumble upon a signal-jamming device that Hugh and Diana must carefully avoid and destroy.

| Point of Interest | Details |
|---|---|
| Holo-Wall |  Locate the Holo-Wall in this area once the device is destroyed. |
| Safe Box 4 & Dad's Room File |  Pick up these items in the hidden room after the Holo-Wall is found. |
| Safe Box 5 |  Destroy the Filament Mass next to the Sec 06 Door and open the Safe Box. |
| Safe Box 6 |  Hack and enter the Sec 06 Door to reach a room covered with trees. Another Safe Box containing three Upgrade Components is encountered along the path. |
Head past the Safe Box that was just opened, defeat a Creeper, and solve the tree problem by activating the Mini Lim Regulator.

Continue ahead to the path previously blocked by the trees. In the next area, there will be a signal jammer and a Crusher MK-II.

The battle does not end there, as two Walkers and a Walker MK-II appear afterward.

Successfully defeating the group of enemies removes the Lockdown Mode.

| Point of Interest | Details |
|---|---|
| Safe Box 7 & A New Position Holo |  Keep heading straight toward the sleeping quarters to find these two. |
After that, return to the room with the holographic map and hack the Locked Door.
| Point of Interest | Details |
|---|---|
| Swing REM |  Pass through and look at the wall beside the door. Destroy the Filament Mass blocking the path, enter the narrow pathway, and drop down to access the area containing this Read Earth Memory. |
| Mini Cabin Buddy 2 |  In the same room, turn around and find the Mini Cabin Buddy behind the glass panel. Climb the container and crates to find the right positioning to shoot it. |
Backtrack to the main path and prepare for a challenge in the upcoming security area.

| Point of Interest | Details |
|---|---|
| Safe Box 8 |  Open this Safe Box first for a Cabin Coin. |
| Safe Box 9 |  There is a Safe Box on the other side as well. To reach it safely, clear the enemies first, then hack the terminal to raise the platform and reach the ledge. |
There are two waves of enemies approaching after jumping down. Here is a list of them:
| No. | Security Area Enemies |
|---|---|
| First Wave |  ・2 Impeder ・1 Lancer ・1 Signal-Jamming Device |
| Second Wave |  ・2 Bomber ・1 Signal-Jamming Device |
With the enemies defeated, Hugh and Diana can push through to the next room.

| Point of Interest | Details |
|---|---|
| Pure Lunum |  Open the Chest inside the room to get this. |
| Safe Box 10 |  Jump onto the stack of crates beside the door and go down to the area behind it. Destroy another Filament Mass to find the last Safe Box in this block.  Exit the area by hacking the wall panel beside it. |
| GeoScience Lab Development Plan File & Upgrade Component 2 |  Ignore the elevator for now and go to the small room to pick these up. |
Once they are done exploring the Soil Research thoroughly, take the Elevator to the Cultivation Lab Station Escape Hatch.

Hugh and Diana then begin their journey to the Terrarium, the Terra Dome's final block.