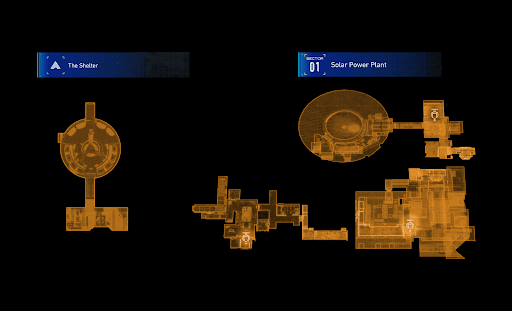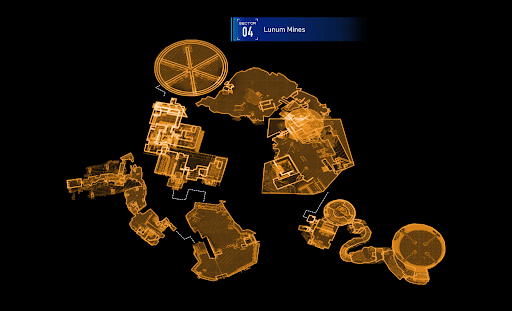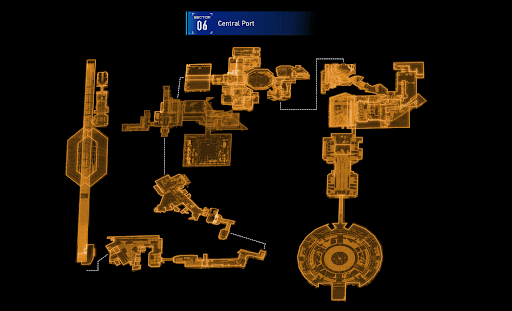


100% Lunum Mines Guide

Collectibles Guide
100% Lunum Mines Collectibles
Mine Entrance
・Safe Box x 3
・Mod x 1
・Storage Expander x 1
・Read Earth Memory x 1
Crane Operation Yard
・Safe Box x 3
・Mod x 2
・Mini Cabin x 1
Warehouse
・Safe Box x 5
・Pure Lunum x 2
・Mod x 1
・Storage Expander x 1
・Read Earth Memory x 1
・Training Data x 1
・Mini Cabin Buddy x 1
Main Excavation Site
・Safe Box x 4
・Pure Lunum x 1
・Mod x 2
・Read Earth Memory x 1
Nexus Tower
・Training Data x 1
・Safe Box x 2
・Pure Lunum x 1
・Mod x 1
・Mini Cabin Buddy x 1
100% Lunum Mines Collectible 1
Mod 1/1
AREA: Mine Entrance

HOW TO GET
| Step | Image | How to get |
|---|---|---|
| 1 | | Go forward through the mines from the entrance. |
| 2 |  | Destroy the misprinted lunafilament with the Lim Eraser Ability. |
| 3 | | Collect the mod Equilibrium. |
100% Lunum Mines Collectible 2
Safe Box 1/3
AREA: Mine Entrance

HOW TO GET
| Step | Image | How to get |
|---|---|---|
| 1 |  | After finding the Homing Missile weapon for the first time, you will find yourself in a large space. |
| 2 |  | Defeat all the enemies in the room. |
| 3 |  | Near the misprinted Lunafilament, jump onto the metallic box with railings. |
| 4 |  | Jump towards the taller container with cardboard boxes. |
| 5 |  | Jump towards the tiered metallic structure. |
| 6 |  | Finally, jump towards the platform with the Safe Box. |
100% Lunum Mines Collectible 3
Read Earth Memory 1/1
AREA: Mine Entrance

HOW TO GET
| Step | Image | How to get |
|---|---|---|
| 1 |  | Get past the LunaDigger from where it first appears and run forward to the end of the area. |
| 2 |  | Enter the building and make your way upstairs. |
| 3 |  | Exit upstairs and jump to the staircase across. |
| 4 |  | Jump down where the staircase breaks and claim Campfire. |
100% Lunum Mines Collectible 4
Safe Box 2/3
AREA: Mine Entrance
Note: This collectible can only be obtained after getting the Deletion Protocol (Cleansing) ability. This ability is acquired in the main story after fixing up Diana.

HOW TO GET
| Step | Image | How to get |
|---|---|---|
| 1 |  | Destroy the Dead Lunafilament with Deletion Protocol. |
| 2 |  | Go through the rooms until you find the area full of lasers. Drop to the ground while avoiding the lasers to avoid damage. |
| 3 |  | Defeat the enemies and collect the Safe Box right after. |
100% Lunum Mines Collectible 5
Safe Box 3/3
AREA: Mine Entrance
Note: This collectible can only be obtained after getting the Deletion Protocol (Cleansing) ability. This ability is acquired in the main story after fixing up Diana.

HOW TO GET
| Step | Image | How to get |
|---|---|---|
| 1 |  | Hack this spot after obtaining Mine Entrance Safe Box 2/3. |
| 2 |  | Make you way up the new platforms while avoiding the lasers and defeating enemies. |
| 3 | | Collect the Safe Box from the room. |
100% Lunum Mines Collectible 6
Storage Expander 1/1
AREA: Mine Entrance
Note: This collectible can only be obtained after getting the Deletion Protocol (Cleansing) ability. This ability is acquired in the main story after fixing up Diana.
HOW TO GET
| Step | Image | How to get |
|---|---|---|
| 1 | | Hack this spot after obtaining Mine Entrance Safe Box 2/3. |
| 2 | | Make you way up the new platforms while avoiding the lasers and defeating enemies. |
| 3 | | Collect the Storage Expander from the room. |
100% Lunum Mines Collectible 7
Mod 1/2
AREA: Crane Operation Yard

HOW TO GET
| Step | Image | How to get |
|---|---|---|
| 1 |  | Exit the room where you first find the Impact Barrier weapon. |
| 2 |  | Drop to the ground and go to the area where the crane is picking up sand. |
| 3 |  | Wait for the crane to bring you up and jump towards the raised platform with Analog Aggression. |
100% Lunum Mines Collectible 8
Safe Box 1/3
AREA: Crane Operation Yard

HOW TO GET
| Step | Image | How to get |
|---|---|---|
| 1 |  | From Crane Operation Yard Mod 1/2, drop to the ground and get to the stage. |
| 2 |  | From the stage, run to the bunker to the north-east. |
| 3 |  | Defeat the enemies inside. |
| 4 |  | Go up the stairs to the second floor and find the Safe Box. |
100% Lunum Mines Collectible 9
Safe Box 2/3
AREA: Crane Operation Yard

HOW TO GET
| Step | Image | How to get |
|---|---|---|
| 1 |  | Hack the spot to drop the giant storage unit. |
| 2 |  | Run and jump to the other side to get the Safe Box. |
100% Lunum Mines Collectible 10
Mini Cabin Buddy 1/1
AREA: Crane Operation Yard

HOW TO GET
On the balcony where this hacking spot is, turn 135 degrees to the right. The Mini Cabin Buddy is twirling around on a post.
100% Lunum Mines Collectible 11
Safe Box 3/3
AREA: Crane Operation Yard

HOW TO GET
| Step | Image | How to get |
|---|---|---|
| 1 |  | From the hacking spot, drop down to the ground. Be careful of the LunaDigger! |
| 2 |  | Head to the side of the bunker. |
| 3 |  | Disrupt the Holo-Wall. |
| 4 |  | Collect the Safe Box. |
100% Lunum Mines Collectible 12
Mod 2/2
AREA: Crane Operation Yard

HOW TO GET
| Step | Image | How to get |
|---|---|---|
| 1 |  | From Crane Operation Yard Safe Box 3/3, run to the stage in the middle of the sand. Don't forget to avoid the LunaDigger! |
| 2 |  | From the stage, run to the boxes that pile up like staircases. |
| 3 |  | Jump to the top of the boxes and jump across to the nearby building. Be careful of enemies! |
| 4 |  | Collect the mod Digital Dominance from the narrow extension on the building. |
100% Lunum Mines Collectible 13
Read Earth Memory 1/1
AREA: Warehouse

HOW TO GET
| Step | Image | How to get |
|---|---|---|
| 1 |  | From the Warehouse Entrance Station Escape Hatch, facing away from the Red Room Gate, head west until you find the red block. Hack the red block twice for it to move backwards twice. |
| 2 |  | Turn right and hack the cube |
| 3 |  | Go near the cube. You will find another red cube on the right side that is perched above. Jump on the platform beside that red cube. |
| 4 |  | Hack the red cube through the black bars to move it backwards. |
| 5 |  | Enter the space from where the red cube vacated to reach the REM Bug Net. |
100% Lunum Mines Collectible 14
Safe Box 1/5
AREA: Warehouse

HOW TO GET
| Step | Image | How to get |
|---|---|---|
| 1 |  | Go to the second red box that you moved to get Warehouse REM 1/1. Hack it to push it backwards and open up the way the way to the right. |
| 2 |  | Defeat the enemies in the room. |
| 3 |  | Hack the lower left red box to push it backwards, revealing the area where the Safe Box is. |
| 4 |  | Hack the red box behind the Safe Box twice. Return to the area inside to claim the Safe Box. |
100% Lunum Mines Collectible 15
Safe Box 2/5
AREA: Warehouse

HOW TO GET
| Step | Image | How to get |
|---|---|---|
| 1 |  | After defeating all the enemies in the room next to the Unit Printer, move the red box backwards to access the pathway leading to the back of the other boxes. |
| 2 |  | Move the red box back to its initial position and then target the other box left behind. Push the red box from this angle. |
| 3 |  | Climb up to the red box, now adjacent to the stairs. |
| 4 |  | Jump to the edge of the other side. |
| 5 |  | Jump up to the adjacent platform to get the Safe Box. |
100% Lunum Mines Collectible 16
Mod 1/1
AREA: Warehouse

HOW TO GET
| Step | Image | How to get |
|---|---|---|
| 1 |  | From Warehouse Safe Box 2/5, drop down to the red boxes. |
| 2 |  | Jump to the right side of the torn tarp roof, facing the larger room. Hack the red box seen through the tarp to move it. |
| 3 |  | Move the adjacent red box as well. |
| 4 |  | Drop down to claim the mod Nice Nodes. |
100% Lunum Mines Collectible 17
Pure Lunum 1/2
AREA: Warehouse

HOW TO GET
Climb up the stairs in the large room and head inside the door in front of it.
100% Lunum Mines Collectible 18
Safe Box 3/5
AREA: Warehouse

HOW TO GET
| Step | Image | How to get |
|---|---|---|
| 1 |  | Enter the room next to where you get Warehouse Lunum 1/2 by hacking the door open. |
| 2 |  | Push the first red box towards the metallic structure with a silver box inside of it. |
| 3 |  | Jump on the box and onto the structure to claim the Safe Box. |
100% Lunum Mines Collectible 19
Safe Box 4/5
AREA: Warehouse

HOW TO GET
| Step | Image | How to get |
|---|---|---|
| 1 |  | Drop down from where you get Warehouse Safe Box 3/5 and push the red box twice in the direction towards the larger area with many boxes. |
| 2 |  | Jump up on the red box and jump towards the higher stacked boxes. |
| 3 |  | Make your way to the Safe Box and claim it. |
100% Lunum Mines Collectible 20
Training Data 1/1
AREA: Warehouse

HOW TO GET
| Step | Image | How to get |
|---|---|---|
| 1 |  | From the top of this this zip rail, push the red box from across you further back. |
| 2 |  | Push the box on the left of the second row towards the right side. |
| 3 |  | Jump on the boxes to get to the top of the left side. |
| 4 |  | Push the barred box away from you. |
| 5 |  | Climb up the stairs and jump your way to the upper floor. |
| 6 |  | Go past the zip rail and collect the Training Data. |
100% Lunum Mines Collectible 21
Safe Box 5/5
AREA: Warehouse

HOW TO GET
| Step | Image | How to get |
|---|---|---|
| 1 |  | After doing Step 4 for Warehouse Training Data 1/1, push the box on the left of the third row towards the right side. |
| 2 |  | Jump on the boxes and make you way to the Safe Box. |
100% Lunum Mines Collectible 22
100% Lunum Mines Collectible 23
Storage Expander 1/1
AREA: Warehouse

HOW TO GET
Collect this after finishing the Red Zone in this area.
100% Lunum Mines Collectible 24
Mini Cabin Buddy 1/1
AREA: Warehouse

HOW TO GET
From Warehouse Training Data 1/1, point your gun to the ceiling and find the Mini Cabin Buddy on one of the pipes in the room.
100% Lunum Mines Collectible 25
Mod 1/2
AREA: Main Excavation Site

HOW TO GET
| Step | Image | How to get |
|---|---|---|
| 1 |  | Exit the Mining Control Room and head towards the building to the northeast. |
| 2 |  | Jump your way to the roof top. Push the red box away from you. |
| 3 |  | Go inside the building and push the red box towards the outside. |
| 4 |  | Jump into the hole and find the mod Eagle Eye there. |
100% Lunum Mines Collectible 26
Safe Box 1/4
AREA: Main Excavation Site
HOW TO GET
| Step | Image | How to get |
|---|---|---|
| 1 | | Exit the Mining Control Room and head towards the building to the northeast. |
| 2 | | Jump your way to the roof top. Push the red box away from you. |
| 3 | | Go inside the building and push the red box towards the outside. |
| 4 | | Jump into the hole and find the Safe Box there. |
100% Lunum Mines Collectible 27
Read Earth Memory 1/1
AREA: Main Excavation Site

HOW TO GET
From the cutscene area, move to the right and jump over the fence to find the REM Tent.
100% Lunum Mines Collectible 28
Safe Box 2/4
AREA: Main Excavation Site

HOW TO GET
| Step | Image | How to get |
|---|---|---|
| 1 |  | Hack this spot to drop down the large shipment container. |
| 2 |  | Jump across to the other side using the shipment container. |
| 3 |  | Claim the Safe Box. |
100% Lunum Mines Collectible 29
Safe Box 3/4
AREA: Main Excavation Site

HOW TO GET
Utilize Diana's Lim Eraser Ability to get rid of the misprinted lunafilament. Claim the Safe Box behind where they were.
100% Lunum Mines Collectible 30
Mod 2/2
AREA: Main Excavation Site

HOW TO GET
| Step | Image | How to get |
|---|---|---|
| 1 |  | From this hacking spot, run to the area with several red boxes. |
| 2 |  | Push the first red box backwards. |
| 3 |  | Push the third red box backwards. |
| 4 |  | Push the second red box to the left. |
| 5 |  | Push the third red box back to its original position. |
| 6 |  | Push the red box that was above the third box upwards. |
| 7 |  | Climb up the the boxes. Jump to the other side using the moving wall platforms while avoiding the projectiles from the enemy robot. |
| 8 |  | Defeat the enemy robot. |
| 9 |  | Claim the mod Synaptic Response. |
100% Lunum Mines Collectible 31
Pure Lunum 1/1
AREA: Main Excavation Site

HOW TO GET
After finishing the battle in the room next to this unit printer, claim the Pure Lunum.
100% Lunum Mines Collectible 32
Safe Box 4/4
AREA: Main Excavation Site
Note: This collectible can only be obtained after getting the Deletion Protocol (Cleansing) ability. This ability is acquired in the main story after fixing up Diana.

HOW TO GET
Use Deletion Protocol to get rid of the Dead LunaFilament. You will then have access to the Safe Box.
100% Lunum Mines Collectible 33
Training Data 1/1
AREA: Nexus Tower

HOW TO GET
| Step | Image | How to get |
|---|---|---|
| 1 | Hack this spot in order to get the large shipment container to drop, | |
| 2 |  | Jump to the large door. |
| 3 | | Collect the Training Data as soon as you enter the building. |
100% Lunum Mines Collectible 34
Safe Box 1/2
AREA: Nexus Tower

HOW TO GET
From the Tower Access Point Station Escape Hatch, exit to the circular room. The Safe Box can be located to the northeast of the room.
100% Lunum Mines Collectible 35
Safe Box 2/2
AREA: Nexus Tower

HOW TO GET
Jump down from Safe Box 1/2 and head counterclockwise. Find the Holo-Wall and the Safe Box behind it.
100% Lunum Mines Collectible 36
Pure Lunum 1/1
AREA: Nexus Tower

HOW TO GET
Complete the Red Room whose entrance is right before entering Nexus Tower.
100% Lunum Mines Collectible 37
Mod 1/1
AREA: Nexus Tower
HOW TO GET
Complete the Red Room whose entrance is right before entering Nexus Tower.
100% Lunum Mines Collectible 38
Mini Cabin Buddy 1/1
AREA: Nexus Tower

HOW TO GET
From where you obtained Nexus Tower Safe Box 1/2, look to the windows above to the right. The Mini Cabin Buddy is perched on the sill.