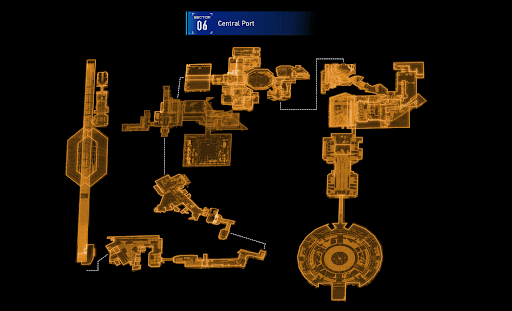


100% Central Port Guide

Collectibles Guide
100% Central Port Collectibles
Port Entrance
・Read Earth Memory x 1
・Mod x 1
・Mini Cabin Buddy x 1
Research Sector
・Training Data x 1
・Safe Box x2
Regolith Lab
・Mod x 2
・Safe Box x 2
・Mini Cabin Buddy x 1
・Pure Lunum x 3
・Read Earth Memory x 1
Lunafilament Lab
・Storage Expander x 1
・Pure Lunum x 3
・Safe Box x 4
・Read Earth Memory x 1
・Training Data x 1
Orbital Elevator
・Safe Box x 5
・Mini Cabin Buddy x 1
・Mod x 1
100% Central Port Collectible 1
Read Earth Memory 1/1
AREA: Port Entrance

HOW TO GET
| Step | Image | How to get |
|---|---|---|
| 1 |  | Reach the Cargo Terminal Station escape hatch. Continue forward and stop when you reach the boxes. |
| 2 |  | Go left by jumping over the boxes. Jump and dash to the side. You will reach a room where you can find the Read Earth Memory: Parasol. Defeat the enemy that will appear and then take the REM. |
100% Central Port Collectible 2
Mod 1/1
AREA: Port Entrance

HOW TO GET
| Step | Image | How to get |
|---|---|---|
| 1 | | Reach the Cargo Terminal Station escape hatch. Continue forward and go down the stairs. Note: If you're in the room where you found the REM, you can just jump down. |
| 2 |  | Near the stairs, you'll find a room where you can find the Mod: Untapped Potential but there's also an enemy inside. |
100% Central Port Collectible 3
Mini Cabin Buddy 1/1
AREA: Port Entrance

HOW TO GET
| Step | Image | How to get |
|---|---|---|
| 1 |  | Reach the large area where you get locked in surrounded by enemies. |
| 2 |  | Across the orange door, you will find the Mini Cabin Buddy in the distance. |
100% Central Port Collectible 4
Training Data 1/1
AREA: Research Sector

HOW TO GET
After going down from the huge elevator, get the Training Data in the next room. You can also grab the Red Gate Key and unlock the escape hatch.
100% Central Port Collectible 5
Safe Box 1/2
AREA: Research Sector

HOW TO GET
| Step | Image | How to get |
|---|---|---|
| 1 |  | Reach the Research Sector Gate Section escape hatch. |
| 2 |  | Just outside the escape hatch room, scan to get an idea where the safe box is. |
| 3 |  | Drop down to the left. But watch out for the enemy! |
| 4 | | Continue going left to get the safe box. |
100% Central Port Collectible 6
Safe Box 2/2
AREA: Research Sector

HOW TO GET
| Step | Image | How to get |
|---|---|---|
| 1 | | Reach the Research Sector Gate Section escape hatch. |
| 2 | | Just outside the escape hatch room, scan to get an idea where the safe box is. |
| 3 |  | To get the safe box below, continue moving forward toward the door. A tough enemy will appear. |
| 4 |  | Go down the stairs toward a broken path. |
| 5 |  | From this spot, you can see the safe box. |
100% Central Port Collectible 7
Mod 1/2
AREA: Regolith Lab

HOW TO GET
| Step | Image | How to get |
|---|---|---|
| 1 |  | Reach the Regolith Lab escape hatch. |
| 2 |  | Facing the escape hatch, climb the stairs on your left. |
| 3 |  | Enter the room and you will see lasers blocking the path. |
| 4 |  | There is a hacking spot above. |
100% Central Port Collectible 8
Safe Box 1/2
AREA: Regolith Lab

HOW TO GET
| Step | Image | How to get |
|---|---|---|
| 1 | | Reach the Regolith Lab escape hatch. |
| 2 | | Facing the escape hatch, climb the stairs on your left. You will then enter a room with lasers. |
| 3 |  | Continue toward the narrow path. You will encounter enemies here. |
| 4 |  | You can find the hacking spot inside the area blocked by the lasers. Continue following the path to find the safe box. |
100% Central Port Collectible 9
Mini Cabin Buddy 1/1
AREA: Regolith Lab

HOW TO GET
| Step | Image | How to get |
|---|---|---|
| 1 | | Reach the Regolith Lab escape hatch. |
| 2 | | Facing the escape hatch, climb the stairs on your left. You will then enter a room with lasers. |
| 3 | | Continue toward the narrow path. You will encounter enemies here. |
| 4 | | You can find the hacking spot inside the area blocked by the lasers. Continue following the path to find a safe box. |
| 5 |  | Once you find the safe box, turn around to look for the Mini Cabin Buddy. |
100% Central Port Collectible 10
Pure Lunum 2/3 (2 Pure Lunum)
AREA: Regolith Lab

HOW TO GET

The Pure Lunum (x2) is a reward after clearing the Red Zone.
100% Central Port Collectible 11
Read Earth Memory 1/1
AREA: Regolith Lab

HOW TO GET
| Step | Image | How to get |
|---|---|---|
| 1 | | Reach the Red Zone in the Regolith Lab. |
| 2 |  | Head toward the next area. |
| 3 |  | You'll reach an area with the blue-and-white platforms. Enemies will appear here so watch out. |
| 4 |  | As you make your way down, you will find the Holo-Wall that keeps the Read Earth Memory: Water Gun. |
100% Central Port Collectible 12
Mod 2/2
AREA: Regolith Lab

HOW TO GET
| Step | Image | How to get |
|---|---|---|
| 1 | | Reach the Red Zone in the Regolith Lab. |
| 2 | | Head toward the next area. |
| 3 | | You'll reach an area with the blue-and-white platforms. Enemies will appear here so watch out. |
| 4 |  | Cleanse the dead filament in the area and hack the panel there. |
| 5 |  | The hacking spot will unlock two paths. Choose the lower one. Head down to the very bottom where you a room with enemies. |
| 6 |  | Defeat the enemies, then get the Mod: Cursed. |
100% Central Port Collectible 13
Safe Box 2/2
AREA: Regolith Lab

HOW TO GET
| Step | Image | How to get |
|---|---|---|
| 1 | | Reach the Red Zone in the Regolith Lab. |
| 2 | | Head toward the next area. |
| 3 | | You'll reach an area with the blue-and-white platforms. Enemies will appear here so watch out. |
| 4 | | Cleanse the dead filament in the area and hack the panel there. |
| 5 |  | The hacking spot will unlock two paths. Choose the upper area and enter the room. You will immediately see the Safe Box there. |
100% Central Port Collectible 14
Pure Lunum 3/3
AREA: Regolith Lab

HOW TO GET
You can find it on your way down the stairs next to the large dead filament that you needed to cleanse.
100% Central Port Collectible 15
Pure Lunum 1/4
AREA: Lunafilament Lab

HOW TO GET

Reward for clearing the Red Zone found near the Connect Center Station escape hatch.
100% Central Port Collectible 16
Storage Expander 1/1
AREA: Lunafilament Lab
HOW TO GET
Reward for clearing the Red Zone found near the Connect Center Station escape hatch.
100% Central Port Collectible 17
Safe Box 1/4
AREA: Lunafilament Lab

HOW TO GET
| Step | Image | How to get |
|---|---|---|
| 1 |  | Go inside the room across the escape hatch. There are 5 hacking spots in this area to unlock the next room. |
| 2 |  | After hacking, cleanse the dead filament found at the bottom. |
100% Central Port Collectible 18
Read Earth Memory 1/1
AREA: Lunafilament Lab

HOW TO GET
| Step | Image | How to get |
|---|---|---|
| 1 | | Go inside the room across the escape hatch. There are 5 hacking spots in this area to unlock the next room. |
| 2 |  | After hacking, enter the next room where you can immediately find the Read Earth Memory: Sandcastle. |
100% Central Port Collectible 19
Pure Lunum 2/3
AREA: Lunafilament Lab

HOW TO GET
In the area where you hack Area 02 Lock, you can find the Pure Lunum.
100% Central Port Collectible 20
Training Data 1/1
AREA: Lunafilament Lab

HOW TO GET

In the area where you hack Area 02 Lock, go to the room nearby. It will lead you to a narrow path where you can find the Training Data.
100% Central Port Collectible 21
Safe Box 3/4 (2 Safe Boxes)
AREA: Lunafilament Lab
| Safe Box 1 | Safe Box 2 |
|---|---|
 |  |
HOW TO GET
| Step | Image | How to get |
|---|---|---|
| 1 |  | Go to the room next to the escape hatch. Watch out for the enemies in this area. |
| 2 |  | You will encounter a cutscene of Hudson and Josh. After this, climb the stairs in the room and cleanse the Dead Filament found in the next room. |
| 3 |  | Jump down the hole revealed by the Dead Filament. |
100% Central Port Collectible 22
Pure Lunum 3/3
AREA: Lunafilament Lab

HOW TO GET
After defeating the Sentinel, enter the next room where you can find a chest containing the Pure Lunum.
100% Central Port Collectible 23
Safe Box 4/4
AREA: Lunafilament Lab

HOW TO GET
After the cutscene of Eight and Dr. Higgins, enter the room on the left. Follow the path until you see the Safe Box.
100% Central Port Collectible 24
Safe Box 1/5
AREA: Orbital Elevator

HOW TO GET
Reach the escape hatch in the Laboratory Main Entrance Station. Head towards the right door to find a platform with a gap. You can see the Safe Box from there.
100% Central Port Collectible 25
Mini Cabin Buddy 1/1
AREA: Orbital Elevator

HOW TO GET

Head towards the right room to find broken platforms where you can find a Safe Box. At the gap, aim downwards to find the Mini Cabin Buddy.
100% Central Port Collectible 26
Safe Box 3/5 (2 Safe Boxes)
AREA: Orbital Elevator
| Safe Box 1 | Safe Box 2 |
|---|---|
 |  |
HOW TO GET
| Step | Image | How to get |
|---|---|---|
| 1 |  | Reach the elongated area where there are platforms, dead filaments, and enemies. |
| 2 |  | After defeating the enemies, enter the Holo-Wall and drop down. |
| 3 |  | Watch out for the enemy that will appear in the room where you can find the two safe boxes. |
100% Central Port Collectible 27
Mod 1/1
AREA: Orbital Elevator

HOW TO GET
| Step | Image | How to get |
|---|---|---|
| 1 |  | Clear the locked zone. |
| 2 |  | Enter the lower door and watch out for the enemies inside. |
| 3 |  | After defeating the enemies, simply follow the path until you reach the top with a door. Once you enter, you can dash through the next area. |
| 4 |  | Facing the upgrade component, go left and follow the path until you see the chest containing the Mod: Adrenaline Flood. |
100% Central Port Collectible 28
Safe Box 4/5
AREA: Orbital Elevator

HOW TO GET
As you make your way through the story, you will eventually see this safe box. You can't miss it.
100% Central Port Collectible 29
Safe Box 5/5
AREA: Orbital Elevator

HOW TO GET
This safe box is just across the escape hatch in the Orbital Elevator Access Station.