Sector 01: Solar Power Plant - Generator Entrance Guide

Main Story
Sector 01: Solar Power Plant - Generator Entrance Quest Summary
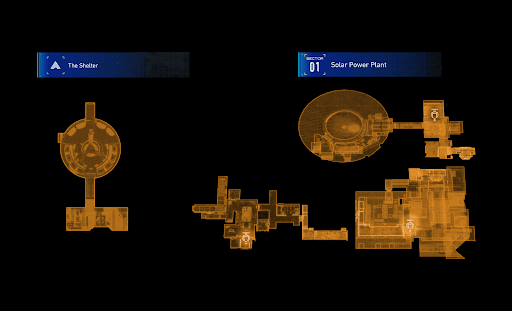
In hopes of restoring the power, Hugh and Diana explore the Solar Power Plant. Three blocks must be investigated: the Generator Entrance, the Power Distribution Center, and The Concourse.
Sector 01: Solar Power Plant - Generator Entrance Walkthrough
Main Objective: Restore Power to the Lunar Base.
From the Shelter, Hugh and Diana ride the tram that connects to the Solar Power Plant.

AREA 01 - Generator Entrance
The duo arrives at the first block, the Generator Entrance.

| Point of Interest | Details |
|---|---|
| Storage Box & Tram Panel |  Beside the Tram Station, players can find a Yellow Storage Box and a panel for returning to the Shelter. |
| WARNING: Severe Tremor Detected |  Warning: Anomaly Detected. This Power Plant has entered Emergency Mode. Cradle power output is currently limited to 35% of standard capacity. Trams and supplementary facilities are now non-operational. To restore full functionality, restart the main power generator on the top floor under administrator supervision. |
| Upgrade Component 1 |  Turn left at the Warning Holographic Sign to find the item hidden behind a pillar. These are components used to upgrade weapons and abilities in the Shelter. |
Enter the next room, where Diana suggests searching for the power switch. Head to the left corridor to start the Scanning tutorial.

| Tutorial | Details |
|---|---|
| Scan |  Diana's scan ability analyzes the surroundings and marks objectives or other important location with icons. |
Once the scan is complete, follow the marker to progress.
| Point of Interest | Details |
|---|---|
| Lockdown Procedures & Re: Hologram Surveillance Email |   Found on top of a box at the end of the hallway. |
Pass through the doorway and turn right after reading the emails. Then, hack the nearby panel to bring the backup generators online.

New Sub-Objective: Reach the Top Floor.
Backtrack to the earlier room. Be prepared to defeat the awakened Walker along the way.

| Tutorial | Details |
|---|---|
| Midair Dodge |  Traps are also activated! Use Midair Dodge to avoid the red lasers. |
Take a short detour to hack the locked door and loot the items inside.

| Point of Interest | Details |
|---|---|
| Box |  Open the Box for Lunafilament. |
| March of the Walkers Holo |  Interact with the Walker on the bed to activate the Holo. |
Exit the room, defeat the Walkers outside, and enter the next door.

Some corners in this area are currently unexplorable; players can return here after unlocking new abilities.
For now, take the path to the right and then head left until the duo encounters a new enemy: the Watcher. The wall can be used as cover to avoid its attacks.

Hugh and Diana must unlock another door to continue. Fortunately, the two required panels are located close by.

| Point of Interest | Details |
|---|---|
| Upgrade Component 2 |  Collect another Upgrade Component from the small room on the left. |
| Red Panel 01 |  Hack the red panel in this room to disarm one of the door locks. |
| Red Panel 02 |  The second panel is found just beside the locked door. |
With both locks disabled, Hugh and Diana can pass through the door and drop down the ledge. They must then defeat a Watcher and two Walkers to leave the Generator Entrance.

Dealing with the threats grants access to the next block, the Power Distribution Center.
| Note |
|---|
| For a complete list of Collectibles in Solar Power Plant, use our Guide! |