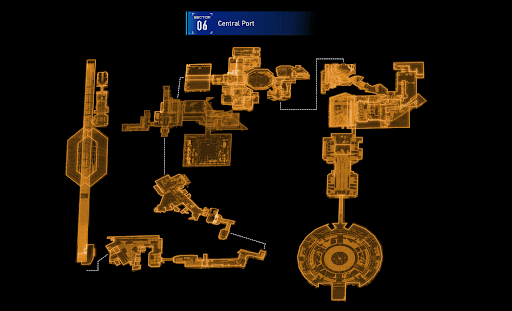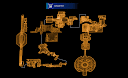


Sector 06: Central Port - Regolith Lab Guide

Main Story
Sector 06: Central Port - Regolith Lab Quest Summary
Regolith Lab is the third block of the Central Port that Hugh and Diana have to pass through! The two of them continue onward to look for a way to the Orbital Elevator.
Sector 06: Central Port - Regolith Lab Walkthrough
Main Objective: Head to Eight.
AREA 03 - Regolith Lab
After passing through the Large Gateway at the Research Sector, Hugh and Diana enters the Regolith Lab block in the Central Port.

Current Sub-Objective: Head for the Orbital Elevator & Cleanse the Filament at its Source.
| Point of Interest | Details |
|---|---|
| Research Sector Lobby Station Escape Hatch |  Located on the left side at the entrance of the block. |
Climb the stairs nearest to the Escape Hatch.

The two of them will find a hallway with collectibles and a Laser Wall.

| Point of Interest | Details |
|---|---|
| Cradle Logistics Network Overview File |  On top of a small canister. |
Turn left and defeat the Anomalous Walker and a Walker Mk-II.

Then, hack the Red Panel to disable the lasers.

| Point of Interest | Details |
|---|---|
| Safe Box 1 |  Pass through the door to see the first Safe Box in the block. It contains a Cabin Coin. |
| Mini Cabin Buddy |  Look up after opening the Safe Box. There's a hidden mini cabin located in the pipe above the path they came in. |
| Heat Transfer Mod |  Hack the next locked door, as well as the red panel on the wall to reach the Mod. |
Return to the Lobby where the Escape Hatch is located and continue toward the second set of stairs on the right.

| Point of Interest | Details |
|---|---|
| Upgrade Component 1 |  Avoid the moving lasers and try to get this Upgrade Component along the way. |
| Red Zone |  Beyond the laser trap they encounter a Red Zone, where two chests of Pure Lunum can be collected. |
Go through the A2 door beside the Red Gate to enter the next area.

Hugh and Diana drop down to the lower level, where they are greeted by several enemies.

With the enemies defeated, Diana can remove the Dead Filament Mass from beneath the platform and hack the Red Panel by the door to clear the laser walls from the room.

| Point of Interest | Details |
|---|---|
| Holo-Wall & Collectibles |  Head back out to encounter a Holo-Wall in the area.  There's a Water Gun REM, Upgrade Component, and Important Notice File to pick up there. |
| Cursed Mod |  Continue to the lower area previously blocked by a Laser Wall. Remove another Dead Filament Mass and go inside.  Reach the lowest floor and defeat all enemies in the area to gain access to the Blue Chest that holds the Mod. |
| Safe Box 2 & An Executive Order Holo |  Return to the main room and climb up.  A Safe Box can be spotted there.  They can also find a Holo located within the same room. |
Proceed to the end of the room to see a Unit Printer and a door leading to a Security Area.

| No. | Regolith Lab Security Area Enemies |
|---|---|
| Wave 1 | ・1 Walker ・1 Walker Mk |
| Wave 2 | ・1 Lancer ・1 Impeder |
| Wave 3 | 2 Anomalous Walker |
| Wave 4 | ・1 Anomalous Executor ・1 Creeper |
Move to the following room after eliminating the robots in the area.

Upon entering the next area, they finally see the huge Dead Filament Mass that must be cleansed.

| Point of Interest | Details |
|---|---|
| Pure Lunum |  Remember to grab the final Pure Lunum from a Chest before exiting the room. |

Hugh and Diana can now explore the next block, known as the Lunafilament Lab.