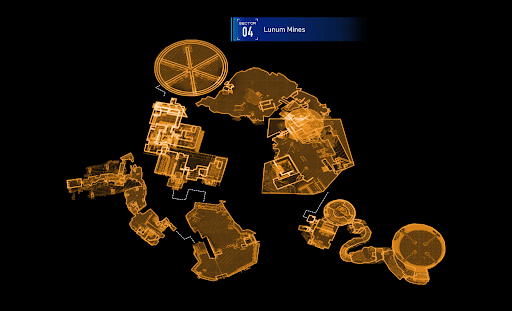


Sector 04: Lunum Mines - Warehouse Guide

Main Story
Sector 04: Lunum Mines - Warehouse Quest Summary
After riding the elevator from the Crane Operation Yard, Hugh and Diana reach the Warehouse. They head deeper into the Lunum Mines' third block to reboot IDUS.
Sector 04: Lunum Mines - Warehouse Walkthrough
Main Objective: Reboot IDUS.
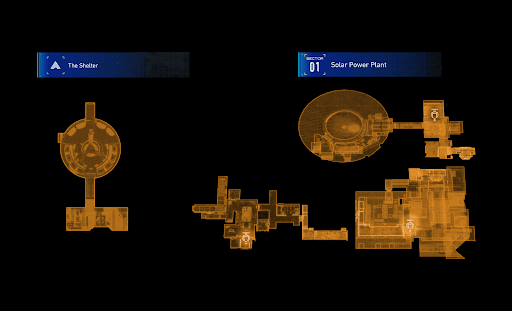
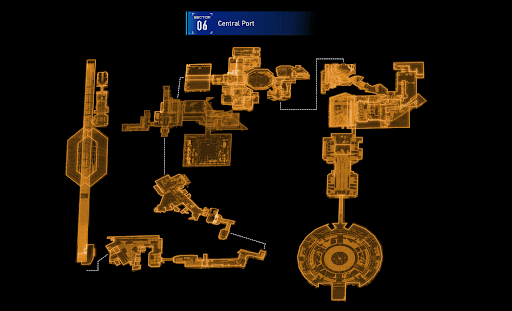
AREA 03 - Warehouse
Hugh and Diana reach the Warehouse Station after using the Elevator from the Crane Operation Yard.

| Point of Interest | Details |
|---|---|
| Warehouse Entrance Station Escape Hatch |  Before exploring the block, players can activate the Escape Hatch and visit the Shelter to resupply. |
Several locations in the room are worth inspecting, including the Red Gate and an Upgrade Component.

| Point of Interest | Details |
|---|---|
| Red Gate |  This area is extremely dangerous. Securing this Red Zone unlocks a section of a Stamp Board. A Red Gate Key is required for entry. Completing this challenge also gives the duo a Storage Expander and Pure Lunum. |
| Upgrade Component 1 |  Climb the box to retrieve the item. |
Head back down and hack the large orange crate. Keep moving it to unblock the next path.

| Point of Interest | Details |
|---|---|
| Bug Net REM |  Once the second orange crate is hacked, climb the platform beside it. Move the upper crate to reach the Bug Net Read Earth Memory. |
| Heat Hacking Node |  Return to the main path and hack the second crate once more to find this Hacking Node. |
A Crusher Mk-II and a Walker jump out in this area. Defeat them to proceed!

| Point of Interest | Details |
|---|---|
| Safe Box 1 |  Hack the lower-left crate backward, then hack the one behind the Safe Box twice to access it. |
When the enemies are eliminated, solve another crate puzzle to find the path to the upper floor.

At the top, they can use the Unit Printer and enter the Security Area to engage additional robots.

| No. | How to Clear the Warehouse Security Area (Yellow Gate) |
|---|---|
| 1 |  There's a Walker MK-II, Walker, and Spider-Bot during the first wave. |
| 2 |  For the second stage, a Defender is sent out by IDUS. |
| 3 |  Break the core of the Defender's four shields to be able to hack it and deal damage. |
| 4 |  Once it is vulnerable, target its weak point, the cooling rod on its center, until it is defeated. |
| 5 |  The lockdown mode in this room is deactivated afterward. |
Make sure to grab these items before leaving the area:
| Point of Interest | Details |
|---|---|
| Upgrade Component 2 |  Hack the nearby crates to reveal a hidden path leading to the second Upgrade Component. |
| Upgrade Component 3 |  Climb the stairs and jump to the opposite side to reach the item. |
| Safe Box 2 & Nice Nodes Mod |  From Upgrade Component 3, continue forward to locate two additional Collectibles. |
| Upgrade Component 4 | Push the nearby crate again to find an Upgrade Component tucked away in the dark corner. |
Pass through the unlocked door to continue the mission.

| Point of Interest | Details |
|---|---|
| Pure Lunum |  Open the Chest for a Pure Lunum. |
| Re: Re: Rumors about Dr. Higgins File |  Interact with the laptop next to a Box and Unit Printer. Interact with the laptop next to a Box and Unit Printer. |
Hack the door at the end of the hall to progress.

Inside, Hugh and Diana must navigate another maze-like room full of movable blocks.
| Point of Interest | Details |
|---|---|
| Safe Box 3 |  Push the first orange crate to reach the Safe Box on the upper platform. |
| Safe Box 4 |  Move the same crate to find another Safe Box hidden on top of the containers on the other side. |
Go back down and follow the path to encounter two Walkers, followed by a final Defender at the end of the corridor. Since the area is cramped, maintain a safe distance to avoid getting cornered.

| Point of Interest | Details |
|---|---|
| Upgrade Component 5 |  Immediately visible in the middle of the next room after winning against the Defender. |
Climb the box to enter the next area where the two find a Zip Rail.

To reach the next block of the Lunum Mines, Hugh and Diana must complete a tricky Zip Rail puzzle. Follow these instructions to clear the challenge and secure the remaining items in the Warehouse:
| Step | How to Solve the Warehouse Zip Rail Puzzle |
|---|---|
| 1 |  Align the crates to create a staircase stack. This process takes some time, and there are several notable items to collect along the way. The first one is the Upgrade Component 6. |
| 2 |  Return to the main path and stack the crates to reach the upper level, where Upgrade Component 7 is found. |
| 3 |  Push another crate and cross to the other side. They can get the Safe Box 5 and Upgrade Component 8 here. |
| 4 |  Climb the arranged staircase to collect the Training Data, then take the Zip Rail to reach an Escape Hatch. Climb the arranged staircase to collect the Training Data, then take the Zip Rail to reach an Escape Hatch.  A quick note to also shoot a Mini Cabin Buddy located near the ceiling before leaving this area! |
Players can opt to use the Warehouse Exit Station Escape Hatch first to take a break.

Next, exit the building by going through the orange door.

Hugh and Diana then arrive at the Main Excavation Site.