


Sector 05: Experimental Pragmatics Guide

Main Story
Sector 05: Experimental Pragmatics Quest Summary
With Diana in heavy disrepair, Hugh heads to the Experimental Pragmatics to fix her back up. There, he learns more about the Doctor that made her...
Sector 05: Experimental Pragmatics Walkthrough
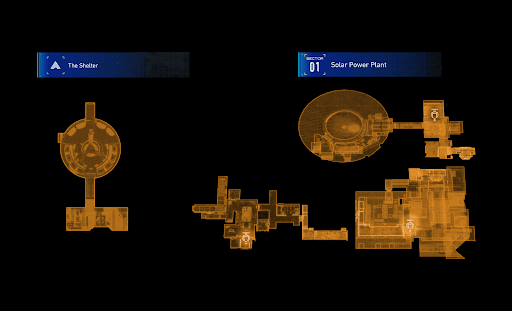
Starting Objective: Head to Experimental Pragmatics
Head west to the door labelled A2 leading to the tram.

Enter the hallway and run to the first door on the right. There, Diana will get repaired, but the dead filament contamination suspends her repairs. Hugh will have to get it out of her, but Diana insists on coming with him

New Objective: Save Diana
Sub-Objective: Get the energy reactor
Before leaving the lab, break the boxes around for supplies
Hugh and Diana will continue on to the second floor, but enemies will hinder the path, as well as a Malfunctioning Diana.
| Tutorial | Details |
|---|---|
| Malfunctioning Diana |  Purple Corrupted Nodes now appear when hacking. Passing through these nodes will temporarily disable your hacking controls and drain your hacking gauge. |
Keep following the path, and then you will encounter a new environmental hazard.
| Tutorial | Details |
|---|---|
| Touching Hazardous Dead Filament |  Touching dead filament interferes with Diana's hacking ability. Hacking will become more difficult as more purple corrupted nodes fill the hacking matrix. |
Hover past the Dead Filament and continue onwards, and you will see the reactor.

Continue onwards, but be careful! The path is convered in more Hazardous Dead Filament and enemies. Along the way, Hugh and Diana will find projections of coversations between Doctor Higgins and other androids.

Later, hack the lift to proceed onwards.

Be careful upon the descent! Enemies will be there waiting, so take care of them.

Continue heading to the reactor, taking down enemies and avoiding the Dead Filament. At the end of this path, take the lift up.

Keep walking until Hugh and Diana come across a window to Earth. To proceed, interact with the projector as instructed.
After that depressing projection, continue on for a very short platforming section and continue to the upper floor.

| Point of Interest | Details |
|---|---|
| Test Android - Pragmata File |  Found next to the Dr. Higgins holo. |
The path forward is blocked, so hack the door open to proceed.

Inside the bedroom, there is a cluster of Filament Masses obstructing the hacking panel to turn off the lasers of the door, destroy them with Diana and then hack the door.

The next room has a few interesting things, as well as Filament Masses to get some resources.
| Point of Interest | Details |
|---|---|
| URGENT: Emailing as Phones are Down Email |  Found to the left of the Filament Masses. |
| Test Pragmata Exclusion/Registration File |  Found on the bed. |
The way forward is blocked, once again, by a cluster of Filament Masses, so destroy that first.

Behind the door is a hacking panel to turn off the laser grid blocking the door. It cannot be accessed from the window, so hack it through the door.

Be careful upon turning off the lasers! There are some Hazardous Dead Filament on the ground so avoid them. Walk to the Laser Grid wall and look up to find the hacking panel to turn off the lasers. Continue forward.

| Point of Interest | Details |
|---|---|
| D-I-O336-7 Shutdown Record File |  Found on the desk |
Proceed to the next room, there Hugh and Diana will reach the Reactor.

Uh oh, it's a trap! Enemies will now spawn so defeat the enemies to continue.

Once the enemies are defeated, Diana's condition gets worse. Hugh will have to carry her the rest of the way. Don't worry, no need to back track. Just follow the path forward.
In the next room, a cutscene will play with another projection of Doctor Higgins.

With that disheartening revelation, rush to the next door and Hugh and Diana will return to the repair lab from the beginning. Place Diana on the machine to begin repairing her.

Not out of the woods yet, though. Shortly after the cutscene is another boss, the Sentinel.
New Objective: Protect Diana
| No. | How to Beat the Sentinel |
|---|---|
| 1 |  Bullets do nothing against the Sentinel, so do not waste ammo on it, therefore... Bullets do nothing against the Sentinel, so do not waste ammo on it, therefore... |
| 2 |  Dodge. Dodge. Dodge. Dodge. Dodge. Dodge. |
| 3 |  This is a scripted boss fight, just survive long enough until Diana is fully repaired. This is a scripted boss fight, just survive long enough until Diana is fully repaired. |
Once Diana returns, press the button prompt to destroy the Sentinel. Congrats! Diana's Overdrive has been upgraded to Deletion Protocol.
| Tutorial | Details |
|---|---|
| Deletion Protocol |  Diana's Overdrive ability has been upgraded to Deletion Protocol When activated it opens nearby enemies, temporarily disables their movement, and deals heavy damage. It also cleanses dead filament and shrinks the hacking matrix to it's smallest size. Use when the hacking gauge is full. |
After a touching reunion with Diana, leave the lab to—
New Objective: Return to the Shelter
As soon as you leave, Hugh will notice the red clusters of dead filament and Diana will say she can remove them now.
| Tutorial | Details |
|---|---|
| Cleanse |  Hold to charge and unleash cleanse Use cleanse on scattered dead filament blocking your path to remove them. Cleanse will automatically recharge after a short time. |
Use Diana to clear the path forward (and hear her cute giggle) and return to the tram.

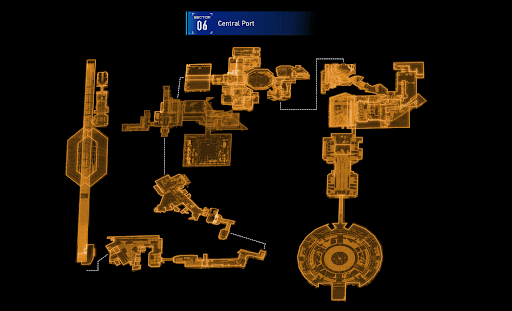
Returning to Shelter, Hugh will be told that the tram can now access the next area, the Central Port.