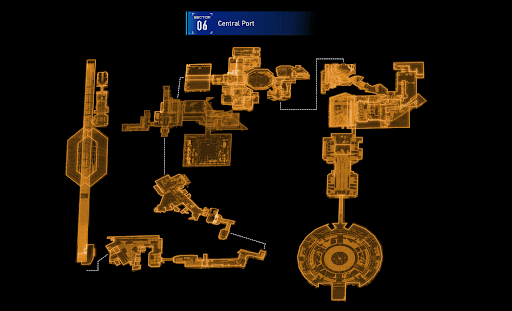


Sector 06: Central Port - Entrance Guide

Main Story
Sector 06: Central Port - Entrance Quest Summary
Determined to stop Eight's plan once and for all, Hugh and Diana rush to Central Port for a final confrontation.
Sector 06: Central Port - Entrance Walkthrough
Starting Objective: Take the tram to the Central Port
When ready, ride the tram to the Central Port Entrance.


Main Objective: Head to Eight
Current Sub-Objective: Reach the core of the Central Port
AREA 01 - Central Port Entrance
Upon arrival, head left and enter the adjacent room .

Continue moving forward until they reach giant shards of dead filament blocking the way. Use Diana's Cleanse ability to clear this obstacle.

Go up the stairs, then down the open platform beside the train. Eliminate the four Walker bots that appear before proceeding.

Another cluster of dead filament blocks the freighter gate. Cleanse and board the freighter.

Turn left and hack the freighter terminal to set things in motion.

| Point of Interest | Details |
|---|---|
| Weapon - Shockwave Gun |  The item is on the left side of the terminal. The item is on the left side of the terminal. |
As the freighter carries them toward the Central Port Dome, Diana questions why Eight intends to send dead filament back to Earth.

The conversation is cut short as the shuttle doors close and a group of enemies drop in. Defeat the Lancer, Walker, and Walker MK-II bots to continue with the mission.

After defeating the enemies, the cargo train resumes its journey. Hugh tells Diana not to hold back when the time comes.
Not so fast! Before they could exit the train, another enemy wave appears. Defeat the Crusher, Impeder, and two Spider bots first to enter the Central Cargo Port.

Just across the train exit, an REM can be seen behind a window. It will become accessible in the next area.

Activate the nearby Escape Hatch and be sure to read the display board before moving on.
| Point of Interest | Details |
|---|---|
| Notice for Earth Cargo and Returnees |  Cargo bound for Earth must undergo inspection and be delivered to the designated warehouse with the proper permit attached. Cargo bound for Earth must undergo inspection and be delivered to the designated warehouse with the proper permit attached.Additionally, anyone returning to Earth must receive a vital signs check at the Central Port before meeting the shuttle crew. |
| Escape Hatch - Cargo Terminal Station |  |

Proceed to the next area, open the box, then walk downstairs. A cutscene occurs as a Walker gets infected with dead filament before attacking the two.

Purge the infected Walkers using Cleanse to knock out their corrupted nodes! Avoid these nodes, as they momentarily disrupt Diana's hacking.

After defeating the enemies, hack the terminal to unlock the climbable platforms.

| Point of Interest | Details |
|---|---|
| Mod - Untapped Potential |  Head left through the door tucked beside the stairway. The mod is inside the blue chest. Caution! A Creeper bot is also lurking in the room. Head left through the door tucked beside the stairway. The mod is inside the blue chest. Caution! A Creeper bot is also lurking in the room.  For 15 seconds, hacking node usage increases attack power by 10% and damage taken is reduced by 10%. |
| REM - Parasol |  Scalable platforms leading to the item can be unlocked via the hacking terminal. Shortcut tip: Time the jump and thrusters carefully to easily reach the area. A Crusher MK-II will spawn at the entrance as the duo approaches the item. |
| Upgrade Component 1 |  |
| Upgrade Component 2 |  Near the ledge, turn right and carefully jump on the rubble to reach the Upgrade Component. Near the ledge, turn right and carefully jump on the rubble to reach the Upgrade Component. |
Climb the nearby platforms and turn right. A Unit Printer sits beside the Challenge Zone featuring three enemy waves, with six enemies in total.
| Point of Interest | Details |
|---|---|
| Box 2 |  |
| Upgrade Component 3 |  |
| Box 3 |  |

After clearing the challenge, proceed to the next room, where the duo finally uncovers Eight's atrocious plan through a holo-recording. She intends to use the dead filament to destroy Earth.

Exit the room and descend the wrecked stairway.
| Point of Interest | Details |
|---|---|
| A Dangerous Discovery? |  |
| Upgrade Component 4 |  At the bottom of the staircase, turn left to find the Upgrade Component in the corner. At the bottom of the staircase, turn left to find the Upgrade Component in the corner. |
Board the freight lift and activate the Elevator Panel to move to the next area.

As the lift descends, Hugh and Diana witness a sea of dead filament surrounding the Orbital Elevator.

Once the lift stops, the duo arrives at the Research Sector.