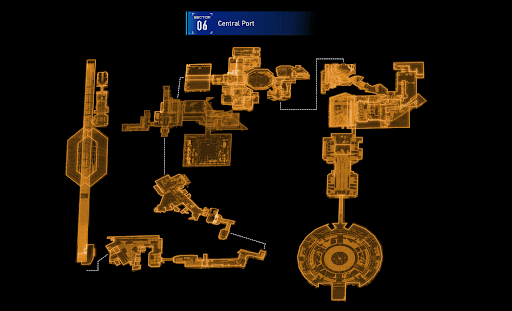


Sector 06: Central Port - Orbital Elevator Guide

Sector 06: Central Port - Orbital Elevator Quest Summary
Hugh and Diana finally reach the Orbital Elevator, only to find Eight waiting for them. What do they do?
Sector 06: Central Port - Orbital Elevator Walkthrough
Main Objective: Head to Eight
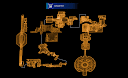
AREA 05 - Orbital Elevator
When ready, take the tram and head to the Orbital Elevator

Upon arrival, go right and jump over the wreckage.

Continue down the path and proceed to the next room.
| Point of Interest | Details |
|---|---|
| Safe Box 1 |  Jump across the other platform. Open to obtain a set amount of Lunafilament. Jump across the other platform. Open to obtain a set amount of Lunafilament. |
| Box 1 |  The box is at the corner of the platform near the staircase. The box is at the corner of the platform near the staircase. |
| Mini Cabin Buddy |  The hidden figure can be seen near the wreckage. |
| Upgrade Component 1 |  The item is down the staircase next to the bottom platform. The item is down the staircase next to the bottom platform. |
| Box 2 |  The box is at the bottom platform. The box is at the bottom platform. |
Descend the staircase and jump to the bottom area. Head straight towards the door at the end of the hallway.

Defeat the incoming enemies to unlock the door! An Anomalous Walker and two Walker MK-II bots will spawn first, followed by an Impeder and another Anomalous Walker.


Enter the room after clearing the challenge, grab the box, and follow the path blocked by dead filament. Cleanse these and hop onto the platforms to reach the top of the room. Deal with the two Anomalous Walkers that spawn nearby and the Gunner sitting behind a blockade of dead filament.

Before leaving the room, jump on the corner platform and disrupt the Holo-Wall. Several items can be found in this section, but watch out for a lurking Creeper!

| Point of Interest | Details |
|---|---|
| Safe Box 2 |  The Safe Box contains a set amount of Lunafilament. |
| Box 6 |  |
| Safe Box 3 |  The Safe Box contains Upgrade Components x 10 The Safe Box contains Upgrade Components x 10 |
| Upgrade Component 2 |  |
| Time To Say Goodbye |  |
| Box 7 |  |
At the end of the section, hack the terminal to reveal a path back and continue to the next room.

The next area features two challenge zones, clear all segments to unlock the doors above and below.

The first zone features two waves: the first consists of two Walkers, a Walker Mk-II, and a Crusher. The second drops in a Lancer, a Bomber, and an Executor. Eliminate all enemies to advance to the next zone.

The second zone has only one set of enemies. Defeat the Anomaly and three Anomalous Walkers to finish the challenge.

| Point of Interest | Details |
|---|---|
| Box 8 |  |
| Box 9 |  |
| Box 10 |  |
| Unit Printer | |
| Box 11 |  |
Before going to the next area, go back to the door near the bottom of the stairs.

Enter the room and fight the three Missile Watchers and a Missile Watcher MK-II, while evading the jamming devices. Move to the next area once the room is secure.

Use the thrusters to climb over the platform across the ledge. Grab the nearby Upgrade Component, then head left towards a blue chest containing a Mod, Adrenaline Flood.

Go back to the top of the staircase near the challenge zone and head to the next area.

Continue ascending the walkway to reach the final area where Eight awaits.

| Point of Interest | Details |
|---|---|
| Box 12 |  |
| Upgrade Component 4 |  |
| Safe Box 4 |  The Safe Box contains Upgrade Components x 6. |
| Safe Box 5 |  The Safe Box contains a Cabin Coin. |
| Orbital Elevator Access Station |  Activate the Escape Hatch and use to return to the Shelter anytime. Activate the Escape Hatch and use to return to the Shelter anytime. |
The duo head inside the Orbital Elevator to confront and stop Eight.

New Main Objective: Stop Eight
Eight transforms into Idea, a corrupted figure bound in glowing dead filament. Hugh and Diana prepare as they face the new monstrosity.

Idea uses a variety of tentacle-based attacks, including sweeps, slams, and piercing thrusts. Most of these have delayed timing, so stay on your toes.
After losing a third of its health, Idea immobilizes Hugh and launches its own counter-hacking phase. At 50% health, it gains a red halo and a new wide-range attack, increasing the difficulty. Red zone markers will appear on the floor during this attack, followed by a continuous bombardment of dead filament. The attack stops and obstacles vanish once Eight descends back to the platform.
At around 25% health, Diana initiates Deletion Protocol, bringing the fight to an end.
| No. | Tips on How to Defeat IDEA |
|---|---|
| 1 | Purge the dead filament around the boss twice to make hacking easier and deal maximum damage. |
| 2 | Prioritize the head at all times! It is Idea's primary weak point. |
| 3 | Use the Stasis Net to keep it immobilized and chain hacks more effectively. |
| 4 | Stay mobile during the dead filament barrage. |
| 5 | Maintain a mid-range distance to better anticipate incoming attacks. |
After finally stopping Eight, the two ride the maintenance elevator to get to the top.

However, as they approach the shuttle, a new threat suddenly emerges.

Head to the Epilogue to find out how Hugh and Diana deal with the new problem.