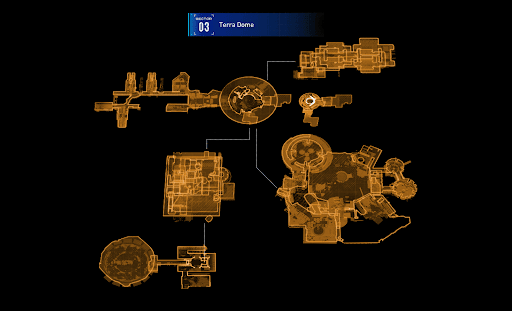


Sector 03: Terra Dome - Entrance Guide

Main Story
Sector 03: Terra Dome - Entrance Quest Summary
Following the enigmatic Eight’s call, Hugh and Diana traverse the overgrown biosphere known as the Terra Dome, restoring its systems to continue with their mission!
Sector 03: Terra Dome - Entrance Walkthrough
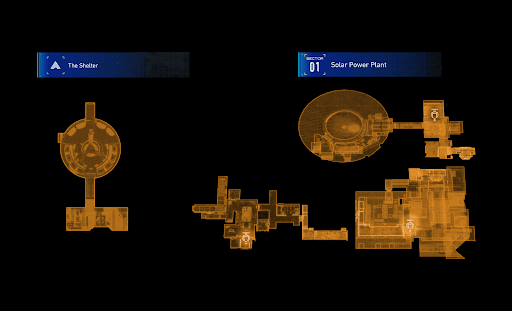
Starting Objective: Take the tram to the Terra Dome
After defeating the Creator, Hugh and Diana return to the Shelter before moving on to the next objective. Talk to Cabin and upgrade the Shelter to Level 2 using the Shelter License Key, obtained from the recent boss battle.

Next, ride the tram towards the Terra Dome Platform.

Main Objective: Find Eight.
AREA 01 - Terra Dome Entrance
The two exit the tram and head up the walkway in search of Eight.

| Point of Interest | Details |
|---|---|
| Upgrade Component 1 |  Take a right turn at the first platform and walk towards the end. The item is hiding behind a pile of crates. Take a right turn at the first platform and walk towards the end. The item is hiding behind a pile of crates. |
Cross over the massive overgrowth and continue down the second walkway. Follow the path while checking the nearby platforms.
| Point of Interest | Details |
|---|---|
| Upgrade Component 2 |  Climb the large metal beam on the right side. Jump over and use the thrusters to safely land on the metal arm, then grab the Upgrade Component. Climb the large metal beam on the right side. Jump over and use the thrusters to safely land on the metal arm, then grab the Upgrade Component. |
| Box |  Head to third platform and find the box at the end. Head to third platform and find the box at the end. |
| Upgrade Component 3 |  Take a left at the fourth platform and grab the Upgrade Component beside the metal pod. Take a left at the fourth platform and grab the Upgrade Component beside the metal pod. |
| Safe Box 1 |  At the fourth platform, jump onto the arm lifting a metal crate and walk to its end. Drop down to the next platform to reach the Safe Box. At the fourth platform, jump onto the arm lifting a metal crate and walk to its end. Drop down to the next platform to reach the Safe Box. |
Take out the Walker hiding behind the pod near the Upgrade Component.

Going back to the walkway, follow the path towards the entrance of the facility.

Near the entrance, a new enemy appears: The Lancer. Defeat it to gain access to the building.

| No. | Tips on How to Defeat a Lancer |
|---|---|
| 1 |  Keep your distance! They can easily close the gap with their sharp, precision strikes and spinning wheel attack. |
| 2 |  Its attacks are highly telegraphed. When the eye or arm flashes red, dodge immediately. |
| 3 |  After attacking, the bot recovers slowly. Use this window to reposition and gain the upper hand. |
Enter the Terra Dome to continue with the search. A display board "Facility Guide" can be spotted immediately on the right side of the room.
| Point of Interest | Details |
|---|---|
| Facility Guide: Terra Dome |  Earth’s Biodiversity Among the Stars. Welcome to the Terra Dome! Using the latest lunafilament output technology, built on plant-growth algorithms, we bring the complex environments of Earth to life here on the lunar surface. Step aboard the Central Lift and explore every area. Everything you see here was printed with the one and only lunafilament. Attention: Certain research areas involve hazardous experiments. Visitors must be accompanied by a guide. |
Carry on to the next room. Turn right and manually reboot the Lim Regulator device to clear the overgrowth blocking the left path.

Unfortunately, before the device could fully activate, IDUS terminates the remote connection. Follow the path and activate the nearby Escape Hatch.
| Point of Interest | Details |
|---|---|
| Escape Hatch 1 |  Access this Escape Hatch to return to the Shelter Access this Escape Hatch to return to the Shelter |
Find the hole in the shattered glass wall to enter and reach the Central Lift.

Hugh and Diana finally reach Eight… or do they? The feline construct reveals to the two that her true form is stuck somewhere else, and they must take the lift to get to her.

However, a massive tree blocks the Central Lift and that still needs to be fixed first.
To remove the obstruction, reboot the devices located in the Plant Factory and Eco Modelling Lab. Both areas may be completed in any order.
SUB-AREA O1 - Plant Factory
Main Objective: Rescue Eight
Current Sub-Objective: Reboot the two lim regulators

As soon as Hugh and Diana enter the Plant Factory, they are greeted by two Crushers and a Lancer. Defeat the enemies and proceed to the lift.

| Point of Interest | Details |
|---|---|
| WARNING: Cleanroom Usage |  Research on self-growing saplings is in progress beyond this point! As you know, the Plant Factory is developing plants that continue to grow after printing, adapting naturally to their environment. These saplings are EXTREMELY delicate, so contamination of the subjects must be avoided at all costs. All visitors entering the cleanroom must *pass through Decontamination Room A or B first! Decontamination cannot be skipped, but you may choose either room freely. -Lin, Plant Factory Development Head |
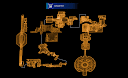
Follow the path until a fork in the road appears, marked by a wall-mounted floor map.

The map shows three branching area sections ahead, each with two possible routes labeled as A and B. Only one side per area needs to be cleared to move forward.
Check the enemy lineup on each display board before entering the preferred room.
| Point of Interest | Details |
|---|---|
| Cultivation Test in Progress 1 |  Enemies in Area - 1A. Enemies in Area - 1A. |
| Cultivation Test in Progress 2 |  Enemies in Area - 1B. Enemies in Area - 1B. |
After clearing the room, proceed to the next area where paths reconnect. Review the upcoming enemies before picking the next route.
Careful! Crossing the display board triggers lasers that seal off the room behind, so choose wisely first.

| Point of Interest | Details |
|---|---|
| Hacking Node: Confuse |  Collect the Hacking Node: Confuse in the middle of the room. Collect the Hacking Node: Confuse in the middle of the room. |
| Cultivation Test in Progress 3 |  Enemies in Area - 2A. Enemies in Area - 2A. |
| Cultivation Test in Progress 4 |  Enemies in Area - 2B. Enemies in Area - 2B. |
After defeating the enemies, proceed to the next area. Three Safe Boxes are present: two on the opposite sides of the area and one in the center. However, only one side Safe Box is accessible at a time, depending on the route previously taken. Choose the Red Zone or settle for the other room to advance.

| Point of Interest | Details |
|---|---|
| Safe Box 2 |  The Safe Box is on the far left side of the room. Contains a set amount of Lunafilament. |
| Box 2 and 3 |  The boxes are at the opposite side of the Safe Box in the middle of the room. |
| Safe Box 3 |  The Safe Box is on the far right side of the room. Contains 3 x Upgrade Components. |
| Safe Box 4 |  The Safe Box is in the middle of the room. Contains a Cabin Coin. The Safe Box is in the middle of the room. Contains a Cabin Coin. |
| Cultivation Test in Progress 5 |  Enemies in Area - 3A. Enemies in Area - 3A. |
| Cultivation Test in Progress 6 |  Enemies in Area - 3B. Enemies in Area - 3B. |
| Red Zone 1 |   The reward for clearing this Red Zone is a Pure Lunum. The reward for clearing this Red Zone is a Pure Lunum. |
A Unit Printer is available for use before engaging the enemies in Area 3.

After clearing the room, proceed to the fourth and final area.
A new enemy appears: The Bomber. Defeat it and another set of enemies to complete the challenge.

| No. | Tips on How to Defeat a Bomber |
|---|---|
| 1 |  Evade! The bot signals incoming attacks by projecting circular blue markers on the ground. |
| 2 |  During its spin attack, eight glowing markers form around it, followed by a burst of explosions. |
| 3 |  Aim for the four small heads on its torso. Avoid staying too close, as it can release a short-range purple energy blast. |
Enter the next room and head to the left side to collect some items. When ready, ride the lift at the end.

| Point of Interest | Details |
|---|---|
| Dialogue 1 - "Family" |  Go down the right stairway and receive a unique dialogue about family between the two. |
| Training Data 1 |  Collect the item near the doorway. |
| Mod - Cheapshot |  The chest contains a new Mod called Cheapshot: Increases attack power by 15% when attacking enemies from behind. |
| Emergency Response Manual |  Plants inside the Terra Dome are monitored by dedicated regulators in each area, which will automatically shut down in the event of a problem. After resolving the issue, reboot the regulators and perform an error check. Regulators can be linked together, but if the system is offline, each must be restarted manually. |
Proceed to the next area and pick up the new weapon: Pulse Carbine, located on the table.

Follow the path to reach the Plant Factory lim regulator.

After rebooting the device, the glass shielding ahead will lift. Drop down to the Central Lift and prepare for the next major area: the Eco Modelling Lab.