Uninvited Summary
Everyone tells Bond to go home so he does. Only, he gets attacked in his own apartment by two assassins and one of the Murto twins acting as a sniper. He manages to get Moneypenny to trace one of the assassins' texts to a phone in a museum holding the Webb Gala.

Bond goes through a lot of hoops but finally pinpoints Murto in the basement. After a huge fight, he comes out victorious, killing Murto. He picks up the earpiece Murto has on and has deduced that his employer is Nicholas Webb.
On his way to hack Webb's phone, he meets with the mysterious woman from Slovakia, Isola, again. They are both drugged and taken away by Nicholas' son, Damien, who had been the one who put a target on Greenway's back.
They eventually escape separately and although Bond causes quite a commotion with a garbage truck, he is able to make it to Greenway.
| Previous Chapter | Next Chapter |
|---|---|
| Beyond The Grave | Knightfall |
Uninvited Walkthrough
[1] Go home.
After M shuts down the case, Bond and Greenway have nothing else to do but go home. Greenway asks to be dropped off at The Crosshairs. Bond is still stuck on how the mercenaries he met were there to get rid of 009 and they are the only ones who know about it. Greenway tells Bond to get away for a few days and blow off steam. This will eat him alive otherwise. He has to treat it as just another job.

Moneypenny contacts Bond and tells him she's on her way to a date. Bond is flabbergasted she'd be on one when they just buried 3 agents. She says that the fact doesn't keep other people from living. She tries to assure Bond that if there's a breach in the system, MI6 will find it, but he is still frustrated about the situation.
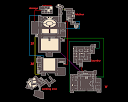
Bond gets home and notices the shoes in the entranceway. He's about to to comment about how Monroe doesn't tidy his collection...until he remembers.

Cressida left a note for Bond on the counter. She says she couldn't stay here any more than she had to and she's staying at her mother's. She tells Bond not to blame himself and that Monroe wouldn't have blamed him either.

You can inspect the items lying around. Feel in your feels about the before time.
Go to your room and pick up the note by the windowsill. It's a suicide note...by...James Bond?!

[2] Defend yourself from the intruder
Upon reading the note, Bond is attacked by someone! Go and defeat this assassin! Aim to parry a lot of their hits.

After beating up the intruder, Bond checks their phone. The message implies that they're not alone in this operation.
| Related Article |
|---|
| How to Get Bond Family Photo (James Bond) and Its Location |
| Combat Guide |
[3] Confront the second intruder
Leave your room and head to the kitchen. You can use the items there to throw at the assassin.

[3] Pursue the shooter.
Duck! There's a sniper on the loose now. Get to the blacony while avoiding the shots. Vault over the ledge and make your way to the sniper. There are some objects in the vicinity you can hack with Q-Lens to distract the shooter.

Get to the crane and climb up. Wield the crane arm and hit the target. You've now staggered them in the meantime.

Use the crane arm to reach the shooter. Of course, it was one of the Murto twins! Chase after them! Unfortunately, during a rooftop jump, Bond only barely makes it to the ledge before they kick him off. He does manage to hang onto one of the window railings, unknown to the twin.

Bond lowers himself to the ground, body beaten up. He calls Moneypenny, asking her to trace the text from the phone that he took off the first assassin.

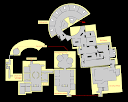
[4] Get in the Gala.
Moneypenny's search leads Bond to an event by Webb Industries. She says she needs to issue an alert if Webb is a potential target. Bond asks her not to so that he can have time to track Murto down.

The event is invitation only. Bond needs to secure an invitation before proceeding down the hall.

| Related Article |
|---|
| How to Get 8 of Acorns and Its Location |
| All Gadgets and How to Use Them |
-
Pickpocket
Find the unlucky chap who will be stolen from tonight. Just pass through the guards and Bond will show off his invitation as he walks by them.

-
Distract all the guards
Using the Dart Phone and the Laser Strap, distract all the guards guarding the entrance to the gala and just walk through.

[5] Find the traced phone.
Enter the gala hall. There are some people you can talk to, but they won't really give you helpful information. There's also a lot of batteries and chemicals lying around to refill your gadgets.

| Related Article |
|---|
| How to Get Concert Poster Collectible and Its Location |
Enter the toilet on the right side (but western wing) of the hall. You have to move through the exhibit before reaching the bathroom. The traced phone is in the counter bin.

Looks like the CCTV captured the people entering the bathroom, but Bond has to patch Moneypenny directly on the security footage to access the feed. She tells him the security is on the first floor, in the eastern wing, staff offices.
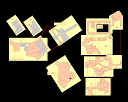
[6] Get upstairs to the Staff Room.
Here are some opportunities to get upstairs.
-
The Tardy Guard
*You can acquire the Anniversary Pin and Ober of Roses Collectibles through this opportunity.
Eavesdrop on these security guards near the Webb Exhibit or near the Press room. They talk about a tardy guard supposed to be stationed at the cloakroom. His lateness might prove to be useful.


Talk to the security guard at the cloakroom entrance and pretend to be security detail. He says he knows he's assigned at the entrance but he's covering for a no-show. Bond can get a guy from the day team instead, stating that the staff rota is on the tablet behind the Cafe counter.

Eavesdrop on the Cafe staff at the counter. Bond learns that the login details for the tablet are in the drawer.

Distract the staff by either making them sick or causing some havoc by hacking the radio or dishwasher in the vicinity. Look through the drawer to find that the login for the tablet is "M00chaLover".
Distract them again somehow to access the tablet. You learn the missing bloke is called Harry Sykes. Go back to the security guy from earlier. Bluff that Harry Sykes is here and that this boss is going to give him a stern warning, letting the security guy go back to his original post.

Enter the Cloakroom and exit through the door on the right. Be careful not to be spotted by civillians if you wanna roam a bit around at the front. Use your gadgets to distract/make sick/blind people when needed. Don't forget the Laser Strap can also unlock closed doors that don't need a key card.

| Related Articles |
|---|
| How to Get Anniversary Pin Collectible and Its Location |
| How to Get Ober of Roses Collectible and Its Location |
Go up the stairs. Sneak inside the exhibit and be careful of the patrolling guards wandering around. As usual, use your surroundings and your gadgets to your advantage. You can takedown people. Just do it when they're alone so that it won't lead to a messy fight. Or get into the fights, as long as you can handle it.

After exiting the exhibit room, obtain the Museum Keycard from the cleaning cart. Proceed to open the door leading to security.

-
The Press Guy
*You can get the Webb Industries Press Pack (Webb Industries) Collectible through this opportunity.
Eavesdrop on the PR lady who is at the left side of the central bar. Apparently the journalist they wanted to talk to is running late. They plan to talk to a different journalist if the guy doesn't turn up.

Approach the PR lady. She says that she'll bring you past security as soon as you get your camera.

Go to the Press room in the eastern wing and distract both guards. Steal the camera sitting between the two tables. Return to the PR lady and she'll bring you to the balcony leading to the Security Staff Room.

| Related Article |
|---|
| How to Get Webb Industries Press Pack Collectible and Its Location |
-
Sneaky sneaky
Enter the Press Room in the eastern wing. Distract the first guard some way and slip in through the entrance. Go up the stairs just like in the The Tardy Guard opportunity.

-
Keycard exclusivity
Eavesdrop on one of the staff talking with the security guard. It seems the staff woman is holding one of those keycards for the doors.

Distract both the staff and security and pickpocket the keycard off of the staff member. Use the keycard to open one of the locked doors to get upstairs.

[7] Get to the CCTV Room.
After all that hubbub, you are finally at the security room! Easy, right? Nope, they threaten to kick Bond out (well Bond, you tell them you're MI6 without any identification? C'mon, mate), so it's time to find a new way in.

Enter the Security area either throught the left door or the right vent. You now have to find the CCTV room at the far right of the area and somehow get inside of it. Be careful of security cams from above! If they catch your form, they will send in reinforcements your way! Act fast if you want to avoid them. Luckily, you can also hack them to disengage them. Look for resources while going around to refill your battery and chemicals.


| Related Article |
|---|
| How to Get Security Notice (Stephen Bright) Collectible and Its Location |
Don't forget that you can bluff to certain civillians but not to others. You can also confront people as a group. See if your chances are good or if lying low is the better choice.
-
Keycard 1
Eavesdrop on the guards next to the room adjacent to the CCTV room. The keycard for the CCTV room is on him. Follow him to the office at the far end of the large room to obtain the keycard.

Take the CCTV Room Keycard.

Enter the CCTV Room.

-
Keycard 2
At the large meeting room, read the note on the table. It will mentione that two guards will have keycards for the night.

In the room across from the meeting room, follow the dark-skinned man. He's the one with the keycard.

Either pickpocket the keycard off of him or beat him up to take it away. Head to the CCTV room afterwards.

-
Balcony Pipe
Find the Staff Note saying that there's a pipe that connects to the CCTV room from the balcony.

Get out into the balcony and climb the pole up to the roof. One of the notes on the roof will say that the skylights can be managed remotely in order to open and close them.

Hack the skylight to open it and drop into the CCTV Room.

[8] Access the CCTV Footage.
Go to the main computer. Bond realizes he doesn't have the password to access it. Moneypenny tells him to go look around since people are bound to have placed a reminder somewhere.

| Related Article |
|---|
| How to Get Kensington Postcard Collectible and Its Location |
Examine the messy desk northwest of the large screens. Afterwards, examine the mug on the table. The password is under the mug - "password12".

Bond accesses the files and finds Murto. Moneypenny tells him he is at the basement archives.
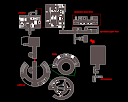
[9] Find Murto.
Exit to the door at the right side of the large screens. There should be an elevator in the room leading directly to the basement.

Head to the right side. You'll find some speakers chained together with a padlock. Destroy it with your Laser Strap.

Enter the room to the right, then kick the door to get to the adjacent room. Turn on the Control Panel to get the gate open. Go through the gate. Get ready for a boss battle.

Defeat Murto.
Here are some tips for the fight!

- You can use floodlights to blind him then rush at him.
- There are battery packs lying around, make sure to keep refilling because a lot of the attacking is through hacking devices.
- Attacking him the same way doesn't work twice! Don't try to keep attacking him at close combat after doing it once because you'll get hurt instead!
- Lure him under hanging lights that you can drop on him. But beware! He can drop them on you too!
- Use the Cargo Lifts to electrocute him.
- Use the Fume Extractor to burn him.
After 3 hits, knock him down for the final blow! Quite a cut scene will play out.
Bond finds out that the Murtos are working for Nicholas Webb. Moneypenny is reluctant to let Bond pursue this as Webb is one of the most powerful men in England. She urges Bond to seek reinforcements from M. Bond says there's no time and asks if Moneypenny can trace the attack team that seems to be aiming for Greenway through the earpiece. She can't hack it with the equipment or lack thereof right now but she can extract data using his Q-Watch. She says all he needs to do is get close to Webb and leave it up to her.

| Related Article |
|---|
| How to Get Tero Murto Locket Collectible and Its Location |
[10] Confront Sir Nicholas Webb.
Find this vent panel and go through it. There's only one pathway forward so no need to worry about twists and turns.

Proceed to the Gala Hall elevator once exiting out of the area. Kick the door open on the right side of the hall to return to the main hall.

A cut scene starts and the mysterious woman from before makes an appearance. She is called to by a man called Damien who speaks highly of her. Her name for now seems to be "Isola". After Isola walks away, Bond ignores Damien in favor of getting nearer Nicholas Webb during his speech so that he can hack Webb's phone once Moneypenny updates his watch.

Unexpectedly, as Bond tries to go through the crowd to get to the front, he collapses.
[11] Hack Damien's phone.
Bond is injected with some kind of serum that wakes him up. He and Isola are both tied up while father and son, Nicholas and Damien, argue. Damien confirms that he has assassins set on Greenway. Nicholas backs off and orders him to "clean up his mess".

Damien starts to beat up Bond while Moneypenny hacks Damien's phone.

You have to decide to stall or provoke Damien in order to keep him near enough for successful hacking while maintaining your health level.
- When they get too far in range and your health is higher, opt to provoke Damien more.
- The number of times needed to do this might vary with the difficulty.
- Towards the end, when the hacking percentage is almost complete, attempt to stall more so that your health doesn't hit 0.
- The decision-making has a timer; it's better to make the decisions only a bit before the timer runs out in order to gain as much health as possible to be ready for bigger attacks.
After the hacking is completed, Damien will leave you two to his lackeys. Isola escapes her ties and gets rid of them.

| Related Article |
|---|
| How to Get King of Shields Collectible and Its Location |
[12] Escape.
Check all the doors. The keycard on you seems to have been taken away. They banter a bit about real names and while Bond doesn't believe Isola's name is Isola, Isola doesn't believe his name is really James Bond.

Boost Isola up to the window. Bond tries to get her to pull him up when the doors open and Bond has to quickly hide. The security specialists that come in talk about a data wipe that happened, maybe because of Bond.

While the two look for their comrades, exit and close the door behind you.
Moneypenny finally gets ahold of Bond. He updates her on what happened, and she tells him that there's an old backlot behind the exhibits, which he can probably escape through.

Move through a series of vents until you get into the workshop if you want an easier time. Your license to kill is activated. Be the king of stealth or run in guns blazing. Either way, make it to the other side of the workshop.
This might prove useful, depending on your route. It's on the northwestern corner of the area.

After getting out of the workshop, make your way to the balcony on the other side. Use the hanging structures.

| Related Article |
|---|
| How to Get 8 of Roses Collectible and Its Location |
Exit the building to the exterior. Moneypenny informs you that Webb Industries has just sent an attack unit to Bond's location. Wonderful. The more the merrier.

Drop in from this roof opening. You'll overhear a security guard saying that some guys called Saunders and White have north exit card keys.

The construction note tells Bond that messing with the generator here will disrupt the security system.

Turn off the generator.

| Related Article |
|---|
| How to Get 9 of Shields Collectible and Its Location |
Get to the ground floor and exit the courtyard. Be wary of the next area; there are many, many enemies, including armored ones. You do have the license to kill here, but a little caution would do you some good. If you have enough battery, you can hack the screens to give you some temporary cover.

Hopefully you get out of there in one piece. Get through the warehouse and exit.

[13] Survive the ambush.
Not a single moment of peace. Dunno how they knew, but they successfully ambushed Bond.

Make it to the truck. Drive away from the mercenaries. There will be a lot of hitting obstacles and cars, I'm afraid.

Bond finds his way to Greenway, and Greenway says their next move...is to move first.

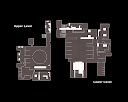
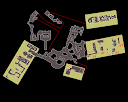
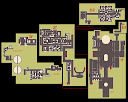
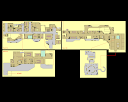
London (Uninvited) Interactive Map

List of All Mission Walkthroughs

| All Mission Walkthroughs | ||
|---|---|---|
| Against All Odds | The Needle's Eye | A Night Out |
| All the Time in the World | The Past Never Dies | Beyond the Grave |
| Uninvited | Knightfall | Time to Die |
| Wave of the Future | For England |
 |
|---|
| 007 First Light Complete Walkthroughs and Map Guides |