Time to Die Summary
Bond is sent to Vietnam to get irrefutable evidence against Webb. They suspect that Damien is in Vietnam trying to stage a copycat murder in order to cover up THEIA's mistakes.

Bond tracks 3 prominent scientists: Theresa Lorca, Ellis White, and Ramon Hernandez. Bond uses a tracking bug to monitor all of them.
In the middle of a party, both Lorca and White get kidnapped by Damien, the latter being collateral damage as Lorca was the intended target. Bond saves both, killing the other Murto twin in the process.
Still, Bond gets caught in an explosion and is captured by Damien. He is saved by Greenway, who helps him while they pursue Damien. While Bond fights off Damien, Greenway dies due to fatal injuries. He tells Bond that he has the heart that MI6 needs and never to lose it.
Back in MI6, Webb blackmails them using the nation's secrets to grant himself immunity. Bond gets the idea of stealing and destroying the core of Webb's hypothetical mirror AI to THEIA - Hyperion. He goes rogue and steals items from Q-Lab before leaving to join Isola on their way to the Antarctic.
| Previous Chapter | Next Chapter |
|---|---|
| Knightfall | Wave of the Future |
Time to Die Walkthrough
[1] Settle at the villa.
Bond stays at The Pearl, an exclusive resort, posing as St. John Smythe, a rich CEO on vacation.

Follow the resort staff to reach your villa. They say that they don't keep any digital records and will need Mr. Smythe to sign in their ledger. Moneypenny says they will definitely need eyes on that ledger. The staff also informs Bond that a package came for him this morning.
Q sent some 'presents' to Bond: Q-Trak, a smart bug that can stay inside someone's bloodstream for 24 hours, and Q-Glasses that record everything they see.

Test the Q-Glasses by inspecting one of the items in the room. Exit the villa and meet with the hotel staff again who will bring you to the ledger. Moneypenny informs you of Damien's location.

Bond flirts with a woman at the reception desk. She seems to be getting a room upgrade. She leaves without giving a name so Bond simply scans and signs the ledger. Moneypenny tells Bond of the potential scientists that might be on the hit list, including Theresa Lorca, the woman they just met. Q also advises not to use the Dart Phone or the Laser Strap on the targets as they can interfere with the functionality.

[2] Look for the three potential targets.
You can ask this hotel staff about the three targets. She will tell you that Ellis White was at the Velvet Lantern Bar this morning, cannot tell you more about Ramon Hernandez, and has not seen Theresa Lorca today, but informs you that she extended her original stay.

| Related Article |
|---|
| How to Get 8 of Shields Collectible and Its Location |
| How to Get King of Roses Collectible and Its Location |
-
Ramon Hernandez
-
Cliff Climbing
Eavesdrop on the security detail at the bar. They talk about how Hernandez is at the Hung Villa but how he should (and probably won't) change his place since someone could scale the cliff that the villa is on. The villa is under where Bond currently is.

Hung Villa's entrance is easily distinguishable by its closed gate being guarded by two guards. Turn left from there.

Drop down into the leafy area and climb up the rocky ledges. This will bring you into the villa's premises.

Get to the 2nd floor of the villa to meet Hernandez. You can either sneak around everyone or cause a bit of chaos.

- Yoga Mat
*You can get the 9 of Roses Collectible through this opportunity
Eavesdrop on the man in Tranquility Cave. He's looking for Hernadez' bright blue yoga mat and is told it's in the storage room behind him.

Distract the staff in some way and pickpocket the Yoga Storage Key off of him. Enter the storage room

| Related Article |
|---|
| How to Get 9 of Roses and its Location |
Read the note. It says that the guards in Hung Villa will not let the instructor in without the blue yoga mat. Take the yoga mat below. Moneypenny tells you that apparently, there have been multiple attempts on Hernandez' life in the past already because he doesn't care whose toes he steps on.

Go to the entrance of the Hung Villa and bluff being the yoga instructor.

Now that you're at the Hung Villa, you just have to find Hernandez. He's on the second floor of his villa, surrounded by many of his guards. Don't worry, you won't have to fight them.
| Related Articles |
|---|
| How to Get Under of Bells Collectible and Its Location |
| How to Get Tarot Deck Collectible and Its Location |
Announce yourself to Hernandez as a member of MI6. He threatens you anyway but Moneypenny says to say that you know about "Agua Verde" and he'll become a lot friendlier.

-
Ellis White
Eavesdrop on this couple at the Velvet Lantern Bar. The woman tells her boyfriend that someone hit on her, saying that he's friends with the famous Ellis White and that they're partying at the Ocean View Bar. Moneypenny pins the location for you.

Someone guarding the entrance to Ocean View Bar says that they're not letting anyone in without an invitation. Right after, you can overhear guests talking about the party where the invite seems to be a flyer.

Distract the lady and pickpocket the flyer in her pocket. Head back to Ocean View Bar and get in. On the way, you can overhear White berating his assistant who he had originally given the day off because he wants the bar to serve drinks to girls. Perhaps that information will prove useful later.

| Related Article |
|---|
| How to Get Vietnam Postcard and its Location |
Approach Ellis White. His bodyguards will stop you, saying not just anyone can get close to White. Bond offers to fix his drinks problem, seeing as the resort shut them down for disturbing the other guests. White says if Bond joins his buddy Jonty in getting him drinks from the minibar, White will be willing to talk to Bond properly.

Follow Jonty. He explains that the staff threw him out earlier for getting near the storage area for the minibar keys.

Take the wine list on the bar table. Talk to the bartender in the front and order off-menu. Bluff in some way to make the bartender leave their post. Enter the staff area behind the bar. Be sneaky! Distract the workers inside to get to the inner part of the storage.

Retrieve the Mini Bar keys and return to Jonty.

Open up the minibar and serve White the drinks. You can stay and make some conversation after the Q-Trak is live, or you can skedaddle.

-
Theresa Lorca
Go to the Serenity Space and you will find Theresa Lorca sitting in a pergola by the pool. You are rebuffed by the staff though, telling you that the area is currently full.

- Sick Guest
Make one of the other guests sick with the Dart Phone and suddenly a slot will open up.

- Pool Parkour
At the sign which only points where the reception is, climb up the ledge beside it.

Vault over the fence to get into Serenity Space.

Bond stages a way to 'organically' interact with Lorca. Her research is on creating a super strain of algae that is very efficient at taking in carbon dioxide.

| Related Article |
|---|
| How to Get Keynote Presentation (Theresa Lorca) Collectible and Its Location |
[3] Get to Lorca's Villa
Moneypenny updates Bond that Damien and his men have arrived in Vietnam and are a few hours away from the resort. Bond decides he's ready enough and that relaxing is the way to spend the last remaining hours of peace. He asks Moneypenny some questions about the mission.

Just as Bond gets his drink, Moneypenny spots something wrong with Lorca's vitals and tells Bond to get to her location now.

If you wait for a while to go to the villa, Lorca's vitals will return to normal, however, you still have to visit her anyway to check on her.
Vault over the Emperor Villa gate.

Bond runs in to see...Lorca perfectly find and getting out of her pool. It turns out she was free-diving so of course her heart beat and oxygen levels were dropping. Things turn a little spicy so we're fastforwarding to night time.
[4] Get ready for the party.
Bond gets ready for the party.

Pick up the bowtie Q sent. Bond doesn't know how to tie a bowtie so Q gets on the line to help him. Follow Q's instructions and hit the quick time events. Soon, you'll have a nice, slightly asymmetrical bowtie.
| Related articles |
|---|
| How to Get Diving Watch Collectible and Its Location |
| How to Get Caliban Profile (Caliban) Collectible and Its Location |
| How to Get Banner of Acorns Collectible and Its Location |
Head towards the party outside Smythe's villa. Moneypenny says that Lorca's heart rate is really high and tells Bond to go over to the Emperor Villa. She's not alone like earlier. Ellis is there too.

[5] Find Lorca and White.
Bond asks for an update on Damien and Moneypenny realizes she's been tracking the wrong SUVs. He rushes to the Emperor Villa, but this time, there's nothing to help him vault over the gate. He turns around and spots cars that potentially belong to Damien.

Climb the cliffside to infiltrate the Emperor Villa. You'll find Damien's mercanries lurking around. Your licenses to kill will be activated. Remember that your pistol also has a silencer now so using it won't be audible to those far from it.

| Related Article |
|---|
| Combat Guide |
Head towards the roof to get in. Be careful of the soldiers roaming the scene. Be careful when deciding whether to shoot, maim, or sneak around. There can be some reinforcements just not in your view. It'll be good to carry gadgets that blind or flash at the targets. Don't forget that armored enemies need more than one shot to go down.

Go around the front of the house to the side and reach the staircase.

At the rooftop, Bond spots Damien and his men holding Lorca hostage. One of them drops White off and Damien is pissed, saying that the Caliban never left collateral damage before and now they have to make White disappear. Moneypenny says to now go get Lorca, but Bond refuses, saying that they'll kill Ellis if he doesn't act, and he has to at least try.

[6] Save White.
You need to get to the Wine Cellar. Be careful of dropping into the house since the place is crawling with soldiers. Best to check the numbers you're up against before doing anything.

From the rooftop, going down from the skyline will place you at the 2nd floor. The Wine Cellar is in the basement. If you go down from the bar and into the open dining room area, there's a shorcut going to the basement hidden within the leafy indoor garden as seen above.

Shorcut or not, White will be behind this soor. You can choose to set a trap on the door or kick it open. Be ready to fight the soldiers.

Smythe in his woozy, beaten-up state, mistakes Bond as a co-conspirator of Damien's. A fight is sadly inevitable. Rough him up a bit but he should be fine.

[7] Find Lorca.
Get out of the villa by going through the cliff by the window. You will exit into an outdoor bar with more soldiers. Head towards the mission indicator. It looks like that the other guests and staff have somehow evacuated the premises.

Bond finds Murto with Lorca and ziplines to them. His ambush causes Murto to drop something, causing a fire behind him while Lorca is to the side, unconscious.

[8] Defeat Murto.
Unlike with Tero where you mostly fought using your surroundings, this requires a fist fight.

- He will try to grab you a lot so make sure to side-step when you see the red glint.
- Use the items around to throw it at him.
After pushing Murto into the fire, Bond will wake Lorca up so that they can escape.

Bond is able to get Lorca out of the burning storage room, but Murto isn't done quite yet. Fight part 2!

- Much is the same as earlier but the hits hit even harder now.
- Make sure to keep an eye on your health and maybe resort to throwing items for moments of reprieve.
Now, escape!
[9] Stall for time.
Bond is not dead, he is, however, strapped onto some block of cement. Moneypenny wakes him up and he takes a look at his surroundings. Slabs of broken cement around him but not a soul in sight.

Damien comes in with a giant chainsaw, fully intending to cut Bond in half. Keep provoking Damien in some way to stall time.

Before the chainsaw touches Bond, Greenway saves the day. He undoes Bond's straps from his position but is unable to get the handcuffs off.

[10] Find your way to Greenway.
Bond has his hands tied, so Greenway decides that Bond makes the call using his Q-Lens and have Greenway shoot them from his distant location.

Avoid the shots of the soldiers while keeping them in sight so that you can call down Greenway. You can also ask him to take down the large towers so that they can fall on your enemies.

Greenway appears and cuts Bond's cuffs off. He gives him a gun and gives him the plan: push forward, corner Damien, and bring him down.

| Related Article |
|---|
| How to Get Gun Case (Riptide) Collectible and Its Location |
[11] Pursue Damien.
Moneypenny tracks down Damien using the Q-Watch he took from Bond.

Keep moving forward. There will soon be a lot of enemies. Use the fact that this is a construction site with a lot of dangerous things hanging (pun intended) around. See if you can drop things or make things malfunction that affect a lot of people, not just one or two. There's also a lot of flammable things that explode when shot at.
Greenway gets into a bind and Bond asks Moneypenny to pinpoint his location so he can back him up.

Use the giant truck to save Greenway.

Keep the gunmen at bay while Greenway tries to get the truck running again.

Greenway gets hit but insists that he can hold off the mercs while Bond should go after Damien.

Get down to the warehouse. There'll be a lot of jumping and climbing, but no enemies will shoot at you on the way.
Damien gets a headstart with ambushing Bond. He then injects himself with some power-up juice, so get ready for some hits that hurt hard.

- Throw rocks at Damien to create openings.
- Use the overhead lights to blind Damien temporarily.
- At some point, Damien will start using a gun. It'll be harder to get him close to you so that you can blind him so be patient when luring him in. Trying to take him down isn't very effective.
Bond returns to Greenway but his injuries were actually fatal. He won't make it in time to get help. Instead, he wants Bond to just sit with him and listen. He says Bond has heart and that's what MI6 needs. He asks Bond to not let being an agent change that heart.

[12] Check on the situation at MI6.
MI6 is basically blackmailed by Webb into staying silent about THEIA. M praises Bond for his work in Vietnam but Bond protests that they have to go after Webb. M says this is her call to make sure Webb doesn't endanger England or their agents any further.

| Related Article |
|---|
| How to Get Niko Murto Locket Collectible and Its Location |
Talk to Moneypenny. She asks you to follow her. Bond argues that there must be some way Webb monitors THEIA and he gets an idea from what Damien said about Hyperion - Theia's brother in mythology. There must be another computer that monitors and mirros what THEIA, the AI super computer, does. Moneypenny says that if Bond is hypothetically correct, then the solution is to remove and destroy the core of the computer.

Moneypenny thinks that Hyperion existing is a gamble and the idea of taking its core and destroying it without any solid intel would be reckless. Acting on trying to destroy it without M's consent would be considered high treason.

[13] Rob Q-Lab.
Bond decides to take matters into his own hands. His first agenda? Get field items. However, no one except Q is at Q-lab and Q asks him to join him for a drink. Q tells Bond not to blame himself for Greenway's death or anything that happened. He had known Greenway a long time and Knightfall changed him and plunged him into a darkness he couldn't get out of until Bond came along.

Title drop. Greenway went out with a bang and in glory, and they should celebrate it.

Q leaves after he toasts to Greenway and asks Bond to turn the lights off when he leaves.
| Related Articles |
|---|
| How to Get Trilby Hat Collectible and Its Location |
| How to Get Q-Lab Postcard Collectible and Its Location |
| How to Get Q’s Photo (Rhys Beckett) Collectible and Its Location |
Bond assesses what he'll need for this solo betrayal. Gadgets, a gun, and of course, a Q-Watch.

Access the computer to get an idea of where each object is located. Gadgets are in the gadget testing lab, the watch is in the stress testing lab, pistols are in the armory, and some armour plating is in the vehicle testing lab.

-
Fingerprints
Access one of the scanners. You'll learn that they are biometric scanners that require the right credentials for access. What was the last thing Q touched? The glass of wine.

Return to the table to get Q's fingerprint off the glass. Unfortunately, it's only a partial print. You'll need more prints, even if they're partial. See below where else you can find them.

| Motorcycle | Cube |
|---|---|
 |  |
Go and use the fingerprint fragments on the bioscanner of the Gadgets Room to gain access.
-
Sneak inside the Gadgets Room
Head towards the Gym Room.

Climb on the storage units and lockers to get to the second floor.

Go to the end of the hallway where there are large open windows. Drop down to get into the Gadgets room.

Select your load-out by interacting with the gadget cart.

| Related Article |
|---|
| All Gadgets and How to Use Them |
Get the Q-Watch. It will activate security and you will have to escape out of the stress test room.

-
Hole in the Wall
| Step | Image | Note |
|---|---|---|
| 1 |  | Turn on the laser. |
| 2 |  | Heat up and overload all the switches that look like this. |
| 3 |  | Get inside the car stress test area and activate the blast sequence machine. |
| 4 |  | Get inside the car and wait for the blast sequence to finish. |
| 5 |  | Open the cabinet on the side and use the Laser Strap to detonate the explosives, opening a hole in the wall to escape through. |
-
Escape Hatch
| Step | Image | Note |
|---|---|---|
| 1 | | Turn on the laser. |
| 2 | | Heat up and overload all the switches that look like this. |
| 3 |  | Turn on the furnace. |
| 4 |  | Climb the ladder to the top area. Turn on the valve. |
| 5 |  | Get out through the emergency fire hatch. |
Read the note on the table in the Shooting Range to get the code to the Armoury. Its Waters' high score, "1324".

Put in the code in the Armoury next door to get in.

Get the pistol. Now it's time to go.

[14] Leave MI6.
Bond takes one last look around. He turns off the lights and heads back up. In the lift, Isola contacts Bond, saying that they have the same objective in taking down Nicholas Webb. She gives Bond 24 hours to meet her so that she can bring them to the Antarctic.

Leave the MI6 building.
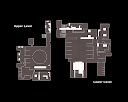
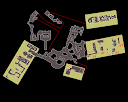
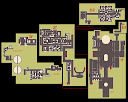
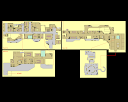
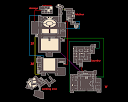
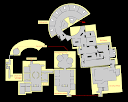
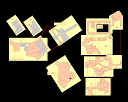
Vietnam (Time to Die) Interactive Map

List of All Mission Walkthroughs

| All Mission Walkthroughs | ||
|---|---|---|
| Against All Odds | The Needle's Eye | A Night Out |
| All the Time in the World | The Past Never Dies | Beyond the Grave |
| Uninvited | Knightfall | Time to Die |
| Wave of the Future | For England |
 |
|---|
| 007 First Light Complete Walkthroughs and Map Guides |