All the Time in the World Summary
The whole team travels to Slovakia, waiting for 009 to show up. Bond is assigned to pretend to be a chaffeur and is tasked with staying outside in the parking lot.

While looking around, he spots a blond bellhop throwing a suitcase over the ledge. He decides to look into it and goes against orders, sneaking himself into the event. The blond man seems to be constantly changing costumes and is somehow connected to the disappearance of the security chief. Bond convinces Monroe to help him despite Cressida being against it.
He stays in pursuit of the blond man and eventually follows him to a cellar, where he finds Monroe dead. The blond man appears and he's not alone. He has a twin and Bond fights them both off. Eventually they run away and Bond tries to diffuse the bomb they set up.
Despite being able to diffuse the bomb, another one goes off and causes chaos all around. He saves Cressida from some rubble, but she can no longer move her legs. Greenway finds them and orders Bond to chase after 009.
After a long car chase and a plane full of turbulence, Bond doesn't manage to catch or capture 009, but was able to leave his watch on the plane, letting it act like a tracking device.
Bond is ordered to join Greenway in pursuing 009 in Mauritania.
| Previous Mission | Next Mission |
|---|---|
| A Night Out | The Past Never Dies |
All the Time in the World Walkthrough
[1] Drive to the venue.
For the mission, Bond will act like the chauffeur to Monroe and Cressida. He is tasked to be the last line of defense and patrol the perimeter of the World Chess Championship.

They talk about 009 and the possibilities surrounding him. Regardless whether they trust Greenway's assessment on the situation or not, it cannot be denied that Greenway knows the man better than any of them.
[2] Get inside of the hotel.
While bored out of his mind, Bond spots a bellhop chucking a suitcase over a ledge. He decides to investigate. Cressida is against this and orders him not to look into it further.

| Related Article |
|---|
| How to Get Ace of Acorns Collectible and Its Location |
Get to the top of the stairway and find the entrance to the hotel. They will not let you in unless you are staff or the press. Find a way to infiltrate the hotel to find the bellhop.
-
Get a Press Badge
Eavesdrop on the woman. They seem to be in contact with a whistleblower regarding the cheating of someone called "Nyvik". They say the contact only wants to talk to Hoffman, who is running late. His press badge was stuffed into one of the big pots in the lower ramparts.

Go downstairs and find the Press Badge.

Talk to the guy at the entrance.

-
Sneak inside thru distraction
Distract the guard somehow and when they're not looking, hang over the ledge at the part where there is a blue blanket.

Climb towards the left and grab onto the pole. Climb upwards to the second floor ledge.

Go right until you reach the open window where you can vault over.

-
Pole climbing
Head to the right side of the entrance and find the pole connected to the building. Climb up to the second floor and hang on to the ledge and keep moving left until you find the open window.

[3] Investigate the blond man.
Go to the main hall. Bond will spot both Greenway and the blond bellhop.

Head west and bump into this staff. Pickpocket their Staff Key. This will help in investigations later.

| Related Article |
|---|
| How to Get Pillow Mint Collectible and Its Location |
Go down the stairs to eavesdrop on some hotel staff. They talk about how an author claims that his suitcase was taken by a bellhop and it disappeared. Could that have have been what Bond witnessed? Apparently, the author, Prendergast is downstairs, wanting to talk to the manager about it. Perhaps some sleuthing can be done.

The area where Bond is, is the 3rd floor. On the second floor is where the tournament and several guests are. The 1st floor is the lobby.

Go down the stairs from the 3rd floor and into the hallway. You can eavesdrop on a mother and son. The elder lady in particular seems concerned about our bellhop.

Pretend to be hotel administration to get information from the elder guest. The bellhop had ignored her when she called out to him thrice. He had just been there and was on his way to the reception.

| Related Articles |
|---|
| How to Get Chess Biography Collectible and Its Location |
| How to Get Ober of Bells Collectible and Its Location |
| How to Get Championship Badge Collectible and Its Location |
Head to the lobby reception on the ground floor and eavesdrop on Prendergast and the staff. Bond will learn that the blond bellhop is not even really a staff member of the hotel.

Talk to Prendergast. He tells you that the bellhop went to the Laundry Room.

Behind the lobby, there is a hallway that leads to a large staff room. Enter it and snoop around. It's a restricted area, so be careful as you make your way to the large office on the right side.

Inspect the Security Note on the desk to get the Laundry Code '1805'. Bond references the Battle of Trafalgar in 1805, hinting that the passcode for the safe is a year found in the room.

Spoilers!
Inspect the Vino Sacramental wine on the right side. The label says it is from 1952. That is the passcode for the safe.
Open the safe to get the Cellar Key and the 6 of Roses Collectible.
| Related Article |
|---|
| How to Get 6 of Roses Collectible and Its Location |
Head back to the reception and turn left. There will be a sign pointing to where the Laundry Room is. Enter '1805' into the number pad.

Sneak downstairs into laundry. Bond sees the blond man bribing the staff to make sure no one follows him. These watchers cannot be bluffed to if they catch Bond.

Use the gadgets to your advantage. Lure the watchers with noisy devices like vacuum cleaners and the like, and hit them with a dart or blind them. Take them down unseen from the others. Throw items if needed! Just remember not to be hasty and to watch their movements lest you wanna be caught.
| Related Articles |
|---|
| All Gadgets and How to Use Them |
If you do get caught, get ready to fight! Best if you guys are as far away from reinforcements as possible.
You can also pick up a chaffeur hat. It'll help you just walk out of there like it's nobody's business.

Unfortunately when you get to where the blond man exited, he is nowhere in sight. All that is there is his used bellhop uniform and a note that says '206'.

Kick the other door in the room to get out. From there, escape out of the window and onto a balcony overlooking the car park. Report to Cressida that the parking space is quiet.

[4] Return to the Hotel.
Climb up the pipe on the side and get back into the building through a window. There are guards hanging around, supposedly warned by an alarm that went off.

As usual, use stealth and spy gadgets to make your way out of there!
Hint! The easiest pathway out is by going to the room to the left from the window. Use the metal armor as a distraction to lure the two guards inside, then make your way out with no worries.
It seems that Monroe knows Bond too well and that he wouldn't let go of the bellhop situation. He tells Bond that he saw a man fitting the description wearing a suit and calling himself "Locke".

Go to the reception at the lobby and ask about Locke. Normally, hotel staff should not give any information about their guests, but this lady fortunately lets Bond know that Locke is Joseph Locke, the insurance guy and he is staying in room 206 on the third floor, west wing.

[6] Head to Room 206
Go up a floor and eavesdrop on the security personnel asking one of the staff. Apparently their chief headed to 206 earlier but has yet to return.

-
Room 205
*You can find the Slovia Postcard Collectible through this opportunity.
Go up another floor and head into the staff room. Pick up the Card Key for Room 205.

Talk to the guard stationed at the west wing and he will let you through after seeing the Key Card. Proceed to Room 205.

| Related Article |
|---|
| How to Get Slovakia Postcard Collectible and Its Location |
Enter the bathroom and exit through the window. The guest will be there taking a bubble bath, but don't worry about it. Hang off the ledge and make your way to Room 206. Fortunately, they left the window open so go through there.

-
Room 207
From the second floor, behind the set-up of the Chess Tournament, vault over the open window. Climb up the pole to the left to the ledge of the second floor. Do not go in through that first open window.

Instead, keep heading to the right. There will be two balconies present. Either by sneaking in or through bluffing, access the 2nd balcony.

Vault over the area with a blue blanket to hang off the ledge again or to walk on it. Keep moving to the right until you find the open window to 206.

Alright, so you finally arrivw at 206. The room is a mess. Inspect the items around.
| Item | Image |
|---|---|
| Security Protocol |  |
| Keycard Holder |  |
| Newspaper |  |
| Wallet |  |
| Room Service |  |
| Discarded Suit (kick the bathroom door) |  |
Answer the door...one of the staff comes in for housekeeping and is caught in surprise but Bond just walks it off.

Singh reports that there seems to be a power surge in the electrical room that crashed the security system. Bond spots the blond man in a chef costume this time and tells Monroe he won't let him slip anymore.
[7] Pursue the blond man.
Head one floor down and into the eastern wing. From the staircase at the eastern wing, , facing the stairs, go left and into the open door leading to a hallway.

Eavesdrop on the security personnel. The logs say that someone went inside the electrical room before the power surge happened. One of them assumes it was Kovac, the security chief, as he is the only one with authorization to go there.

| Related Article |
|---|
| How to Get 6 of Acorns Collectible and Its Location |
Lean by the ledge where a blanket is placed. The blond man can be seen pushing crates into the area below. Vault over the ledge and pursue him. Enter the kitchen and you'll hear some of the staff talk about the blond guy. They assume he's a temp since they've never seen him before.

Bond chases after the man. Monroe reports that he found the security chief stuffed into a laundry bag while bond relays that the blond man snuck in something from a truck while the security scanners are down. Monroe decides to inform Cressida since things are getting serious.

Bond meets the maid from before again, this time she's picking a lock. She saves him from getting caught by security. Cressida tells Bond to stop his pursuit, but as usual, Bond doesn't listen.

Bond will automatically go into a room where there is evidence that the crates held something large. He sees the blond man beyond an iron gate and gives chase. Oc course, it's can't be that easy.

Find another way to get to the other side. Run up the stairs and kick the door open. Proceed through the door on the left side of the hallway, going back to the gaggle of people.
Go past the tournament and make your way to the door on the opposite side. Investigate the dining room

| Item | Image |
|---|---|
| Torn Book Page |  |
| Serving Trolley |  |
| Fireplace |  |
You must solve the fireplace puzzle to continue. If you want to solve it on your own, skip the next part!
If you are stuck and want a hint: Look at the flags around the room.
Select the animals (lion, snake, goat) encircled above to open up the fireplace.

Enter the secret passage. Monroe is watching the suspect and he is unpacking something in the wine cellar. Cressida is not on board with what's happening at all.
Nash reports that 009 has entered the reception area.
| Related Article |
|---|
| How to Get 7 of Bells Collectible and Its Location |
Reach the end of the maze-like cellar and pull the lever...

Bond find Monroe in a pool of his own blood. He checks his pulse, and there is none.
As Bond is about to tell Cressida about Monroe, the blond man kicks the comm off of Bond and destroys it.

You learn that parrying a specialist's combo chain will stagger them. You might end up destroying some glass cases. Use the bottles to your advantage and throw them around.
Bond gets a good hit on the blond man and rushes to the bomb strapped onto one of the pillars.
What's better than one killer blond man? Twins apparently. Joy. Use the bottles around to hit them! Try to keep them on the same side so that one cannot hit you while you're attacking the other one.
Don't forget that you can grab people and throw them around, and even at each other!

After giving them enough of a beating, the game will make the twins push Bond into a wall, where he discovers a sword. It's about to look like a knife fight when the twins run away, seemingly because of time constraint. Bond doesn't chase after them, and instead focuses on the bomb. Choose both the Battery and the Motherboard before choosing the Wires. Hurry! The clock is ticking! Choose the Blue Wire.

Unfortunately, an explosion still happens and Bond is knocked out.
[8] Chase after 009.
Well, this is familiar.

Bond realizes that there must have been a second device. He hears Cressida calling for help and goes towards her.
Climb up the wall to get to Cressida.

Bond gets to her in time before a chandelier falls where she once was. Even so, it seems that she can't move her legs at all. Greenway finds them and tells Bond to chase after 009 and to leave Cressida with him.
You now have the license to kill. Run after 009.
009 makes it to his car. Drive with the mysterious woman and go after him. Do your best not to bump into too many things as it will delay you and cause 009 to escape. Slow down at curves so that you drift instead of getting caught in them.

The red car might be out of view sometimes but just continue following the path the car is on, even when it brings you off-road or to smash through some road signs. This is a LENGTHY car chase.
The mysterious woman gives Bond a gun, telling him she'll flank them while he draws their fire. They cannot let the plane leave.

Run through the forest and into the facility. Remember, you will meet a lot of hostiles. Do headshots to save your ammo or injure the soldiers at their limbs to leave them vulnerable. You'll be able to throw your gun at them once it's out of ammunition. Take guns from fallen enemies to use against them.
Make your way through the compound and catch the plane. It will start to leave without you and somehow, you manage to get yourself inside the vehicle that handles the ramp. Jump onto the rope hanging from the plane's wings.

Two enemies will come up and try to fight you on the wings of the plane. After getting rid of them, a gun man will appear and shoot at you. Run towards him while trying to avoid his shots.

Sneak around the back and get rid of the man at the controls. Override the airplane controls to make it go under some extreme turbulence. Make your way forward while using the turbulence to stagger the gun men. Be careful not to fall into any holes made by the moving cargo.

When Bond makes it to the front, he is kicked away, but he manages to leave his watch strapped onto the plane.

[9] Make your way back to the ground.
You will now be in freefall. Avoid the debris as best as you can. There will be some soldiers with parachutes around you. Of course, knock one out and use them as your ticket to landing safely.

[10] See the aftermath of it all.
Two other trainees died during the explosion. Even after the wake, Bond stands in front of the coffins, lost in thought. Cressida, now in a wheelchair, holds his hand, telling him the service is now over.

Bond is approached by Nicholas Webb, the CEO of Webb Industries, the company responsible for THEIA. He says he knows about Bond and Iceland, and asks why Bond tried to save the crew, despite the very small chance of survival. Bond answers that he just couldn't do nothing.

Greenway then approaches Bond, telling him M wants them at MI6.
M is sending Bond and Greenway to Mauritania to hunt down 009. Greenway thinks Bond is not ready, but he is injured and can't argue that he cannot go alone. Bond is ordered to get gadgets from Q and get a briefing from Moneypenny.

[11] Go to Q-Lab.
Talk to Q. Bond gets a new Q-Watch and earpiece. He tries the new Laser Strap which can blind enemies and disrupt electronics. He also gets the Flash Mine which can adhere to anything and triggers thru proximity. And as usual, he gets the Dart Phone and Smoke Pods.

You can only equip 3 gadgets so choose whichever suits you best. Now, go collect your pistol.
[12] Get briefed by Moneypenny.
Talk to Moneypenny. Apparently the French agent that Bond met at Slovakia was not Agent Roth who she claimed to have been. Ronson is in an artificial coma while Nash has gone underground. The twins Bond met are the Murtos, a pair of Finnish assassins, and the mercenaries Bond fought had been independent contractors.

Greenway joins the meeting. They lost 009's trail in Egypt but managed to find out that his plane was supplied by the Pirate King, Bawma. His home base is in Aleph, Mauritania, where they believe 009 can also be found.
| Related Article |
|---|
| How to Get Facial Composite (Niko and Tero Murto) Collectible and Its Location |
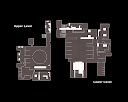
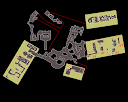
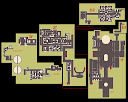
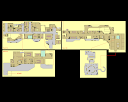
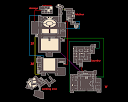
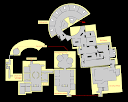
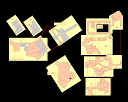
Slovakia (Carpathian Hotel) Interactive Map

List of All Mission Walkthroughs

| All Mission Walkthroughs | ||
|---|---|---|
| Against All Odds | The Needle's Eye | A Night Out |
| All the Time in the World | The Past Never Dies | Beyond the Grave |
| Uninvited | Knightfall | Time to Die |
| Wave of the Future | For England |
 |
|---|
| 007 First Light Complete Walkthroughs and Map Guides |