Beyond The Grave Summary

Bond and Greenway travel to a Shipwreck to find answers about 009. Greenway says he was 009's former friend, but he was sent to take him down after THEIA declared 009 was a traitor. Amongst 009's belongings, Bond and Greenway discover evidence that he was not behind the bombings and was, in fact the target. But a mercenary attack prevents them from bringing the truth to MI6.
| Previous Mission | Next Mission |
|---|---|
| The Past Never Dies | Uninvited |
Walkthrough
[1] Enter Land Lover
Greenway is able to convince Bawma to free them by saying he knows where Bawma's sister Harmony is. After they're freed, Bawma gives them back the Land Rover so they can drive to the Shipwreck.

Before you get into the car, you can pick up a Crocodile tooth collectible on the nearby table.

Greenway instructs Bond to get in and drive the car.
[2] Drive to the Transworld wreck.

As they drive to the Shipwreck, Bond asks what happened between Greenway and 009, and Greenway reveals that 009 and two other agents were implicated as moles by THEIA. Greenway was sent to kill them, but while the other two agents were killed, 009 escaped. Greenway was demoted to a desk jockey until M reactivated the 00 program.
Greenway also reveals the names of the blonde twins: Nico and Tero Murto, debbed by the Finnish security services as the "Great Whites."

You'll be stopped as a bridge needs to be lowered to continue.


Climb the pipe on the right side and lower a lever at the top.

You'll also need to climb a pipe on the left side and lower a lever there. Once the bridge is lowered, climb down and return to the car.
[3] Explore the Shipwreck.

Walk up to the shipwreck, and listen to Greenway. He says the place is likely rigged, but if 009 is using Code War shorthand for a safe room, there must be something inside that he wants them to see. Use your Q-Watch to understand what he means.

Push the panel to proceed into a hallway.
[4] Follow the clues.

Once you exit the hallway, you'll be find yourself insisde an enormous and empty hull. Go right, as there is another symbol on a pillar there. Continue to use the Q-Watch, and you'll see there's another clue at the door across a broken gangway.

Jump across and open the door to reveal another room.

Be careful, as the place is booby trapped. Disarm the trap leading to the next clue. Push down the wall that leads outside.

There will be a few pipes and girders to climb to your next destination. As you climb them, Miss Moneypenny will call. Bond will tell her that Becket is dead.

Enter the opening found on the last platform. The path will be to the left, but the platforms will break apart before you can do anything.

Jump to a lower platform, and then drop to another platform. Use the improvised lift to get back to the top.

Zoom across with the zipline and then open the door to the previous room.

There will be another booby trap in the way, so shimmy along the hanging edge of the platform to avoid it. Then you can disarm the booby trap. Continue back towards the bridge.
| Related Article |
|---|
| How to Get 6 of Shields Collectible and Its Location |

To drop the bridge, you'll need to climb up the pipe and interact with another panel.
As you wait for Greenway to walk across the bridge, he and Bond will discuss more about Beckett. Bond believes there must be some sort of message waiting for Greenway at the end. But Greenway says whatever his plan was, he still killed Bond's fellow recruits and betrayed his government.

Bond and Greenway will then open the door to 009's hideout together to get into 009's stash.
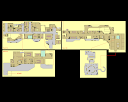
[5] Search 009's Stash.
There are 8 things to investigate here.
| Item | Location |
|---|---|
| Body Armour |  A shelf on your immediate left when entering the room. A shelf on your immediate left when entering the room. |
| Equipment |  The right shelf that can be seen from the entrance. The right shelf that can be seen from the entrance. |
| Ammo and Explosives |  The table near the wall with sticky notes. The table near the wall with sticky notes. |
| Weapons |  The table near the cans. The table near the cans. |
| Supplies |  A shelf on the far end of the room. A shelf on the far end of the room. |
| Ammo Reloader |  On the right side of the workshop area. On the right side of the workshop area. |
| Night Vision Goggles |  On the left side of the workshop area. On the left side of the workshop area. |
| Combat Medical Supplies |  On the far right side of the workshop area. On the far right side of the workshop area. |

After you've completed interacting with all these items, interact with the briefcase on the table. Greenway will teach Bond how to disarm a self-destruct case from Q, and inside it will be the "evidence" that 009 has wanted Greenway to have. He was not the culprit behind the bombings but the target.
[6] Escape.

As you try to leave, the mercenaries from Slovakia arrive to attack you again. They've been following you for the case. You'll get separated from Greenway, who will try to get the Land Rover.
Enemies will arrive from your right and your front. Focus on the ones on the right first so you can properly find cover from the attacks in the front. Use the environments and gadgets around you to take down the enemies in the area.

Exit through the doorway to encounter more mercenaries looking for you. Dispatch them and keep moving from cover to cover.


Once you've taken the mercenaries all down, climb up the stairs and open the door to a new room. Greenway will call to mention that the Land Rover has been destroyed. But you have to keep pushing forward while he makes up a backup plan.

Stealthily take down the guard talking near the edge of the platform.

Take down the enemies below using the sniper rifle on the platform.

Once you've taken them all out, use the improvised lift to get to the high platform on the other side.

There will be more enemies in the area. Take out the leader first so the rest of the mercenaries are easier to take down.

Exit through the doorway and kick down the makeshift door at the end of the corridor to fight even more enemies.


As this area has less cover, you should try and lure them to your own cover one by one or take them down using your environment.


Get to the waypoint and watch Greenway save Bond by running over some mercenaries.
[7] Protect Greenway.

As you try to leave, however, you'll be shot down by a rocket. Before the mercenaries can try and kill Bond, someone tries to open the self-destructive case, and it explodes. This lets Bond take down the mercenary nearest to him and get his gun.
From here, you'll need to take cover from the flipped jeep. Use the rifle you've acquired and all of Greenway's guns to take down the enemies around. Hold out for as long as you can!

Once you've held out long enough, Bawma appears to rescue Bond and Greenway. But with the evidence to exonerate 009 destroyed, there's very little to be happy about.
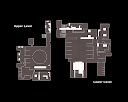
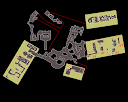
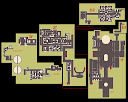
London (Arch Club) Interactive Map

List of All Mission Walkthroughs

| All Mission Walkthroughs | ||
|---|---|---|
| Against All Odds | The Needle's Eye | A Night Out |
| All the Time in the World | The Past Never Dies | Beyond the Grave |
| Uninvited | Knightfall | Time to Die |
| Wave of the Future | For England |
 |
|---|
| 007 First Light Complete Walkthroughs and Map Guides |