For England Summary

After destroying the core of HYPERION, Bond and Isola are incarcerted in MI6. This stay doesn't last for long as Damien and his mercenaries storm MI6 in order to retrieve THEIA's core. Bond pursues Damien to the core but it is too late, he gets the core and wounds Moneypenny in the process. Undeterred Bond gives chase and takes him down once and for all by throwing himself and Damien into the water, drowning Damien. Isola manages to rescue Bond and steals THEIA's core in the process. Bond and M visit Greenway's grave to pay their respects. The latter tells him that he has been inducted to the program as an 00 agent with Bond saying that as the 7th recruit he should be branded as 007. He vows to track down Isola down, recover THEIA's core and find out whom she works for.
| Previous Chapter |
|---|
| Wave of the Future |
For England Walkthrough
[1] Escape the cell block
After the cutscene is finished, follow the quest marker to proceed. For this entire chapter, you have the License to Kill so sneaking around is optional.
Take the weapon of the first guard you see to make it a fair fight.
Head to the door to escape the cell block.
A wounded MI6 staff tells you that Damien's forces managed to break in despite the lockdown. She tells you to get word to M by using the red phone.


[2] Reach the red phone
The next area has a several guards so sneaking around would be preferred. Start by walking to the room up ahead.
Head to the next room with the one-way mirror. There's a panel that you can enter into.
Once you're out. Hide behind the gurney because there is a guard nearby. Take him down once he gets close.
Take down the guard near the door then go inside. Be careful because the other guards will respond to you immediately.


The next room is also littered with guards so be prepared.

Go to the room to the left and takedown the guard inside. Climb the yellow ladder and into the panel. This will lead you to the rafters.

Once you're up there, there are several valves that you can use. These valves will release smoke which you can use as a smokescreen. There are also switches which will release the hanging lights onto the unsuspecting guards below.

Before answering the phone, a guard will try to take you by surprise. Deal with him then answer the phone.

When Bond pick up the phone, M is on the other line.

Bond asks her what's going on but before she explains, she tells you to pick up an earpiece which can be located by going to the guard you just took down.

M instructs you to find Moneypenny so that she can raise the lockdown. Follow the quest marker to the next area.

| Related Article |
|---|
| How to Get King of Bells Collectible and Its Location |
[3] Locate Moneypenny
Head to the double doors then make your way downstairs to the next area.
This office has a lot of enemies but a lot of cover you can use. Some offices have panels that you can access.
Head to the pod on the right.
Bond heads inside but Moneypenny is nowhere in sight. He relays to M that Damien's forces are taking out the cameras. He then realizes that Moneypenny went down to the core where THEIA is stored to protect it.
As M tries to plot your fastest route to the core, the pod gives way and Bond falls to the floor below. Clear the area to proceed.


| Related Articles |
|---|
| How to Get MI6 Postcard Collectible and Its Location |
| How to Get Ace of Shields Collectible and Its Location |
[4] Clear the area
Once again you're forced to take a firefight with the mercenaries so use the environment to your advantage.
There are two snipers perched on the upper floor. Both of them are behind a ballistic shield so you have to force them out. The one on the right is below a gas pipe. Shoot it to kill him.
The one on the left is below a hanging light that you can shoot.
M tells you to get inside the SCIF room. There's an access panel that you can use make your way to THEIA.


[5] Get to THEIA
After making your way out of the vent, head forward. M tells you that hostiles feigned an attack on the lobby which forced a lockdown. Another team then breached the facility through tunnels in Q-Lab.
Press forward until you see an open area with a functioning fan. You have to turn it off before you can make your way to the core.
Climb the ledge.
Jump to the other side then climb up.
Pass through the pipes then turn off the fusebox.
Go through the vent then down the ladder.
You'll pass by Q-Lab before making it to the core. There's an access panel to the left that you can use.
Bond sees Q hiding underneath a couch and tells M that he's laying low.
Keep going through the vent until you see the elevators. Jump to first one.
When you jump, your primary weapon will fall but it's okay. You can always get another one.
Jump to steel beam then drop down.
Climb up the yellow pipe until you see an adjacent smaller pipe.
Jump across then drop down to the elevator hatch to trigger a cutscene.
Bond calmly leaves the elevator telling the mercenaries that he's here to dispatch them. Do so once the cutscene ends.
Make your way to the core. Reminder that any weapon you have will be taken by the core's magnetic field.
Bond makes his way to the core only for Damien to already be there. Damien tells him that everything that has happened: his father's death, his ruined inheritance and reputation, are all his fault. He tries to take Moneypenny hostage but Bond calmly tells her to do what Damien says to which she does.
Damien takes the core but not before wounding Moneypenny on the way out. He bitterly remarks Bond saying that he's hogging all the fun by letting his father die in his arms.
Q comes in the nick of time to tend to Moneypenny. He gives Bond a special edition Q-watch that acts as a master key to his lab. He tells Bond to look for the keys a customized and fully armed Aston Martin Valhalla located in his wardrobe. The Q-watch will also be his guide in getting back to the lab to stop Damien once and for all.


| Related Article |
|---|
| How to Get Wallet (Eve Moneypenny)Collectible and Its Location |
| How to Get 8 of Bells Collectible and Its Location |
[6] Stop Damien
After the cutscene, drop down the hatch and make your way back to the lab. The Q-watch that Q gave you has unlimited charging time.
Hack the fusebox to open the gate. Crouch down then head to the double doors.
A wall will open up and reveal a pathway. Hack another fusebox to release the bridge controls. Jump then climb the ladder on the right.
Hack the third fusebox then jump.
Keep following the quest marker until you make your way to a room with an elevator. Kick the trolley on the left then hack the fusebox behind it.
Jump to the ledge then climb up the yellow pipes.
Keep climbing the shaft until you see an elevator door open.
There's a gadget cart that you can use to prepare your loadout before the big fight. Once you're set, head out the door.


Damien has made his way to the lab and tells his mercenaries to grab everything before leaving. Time for Bond to take the fight to him.
The room you need to get into is on the left side of the garage. Hack one of the cars to emit a smokescreen.
Make a break for it and run to the quest marker. Press the wardrobe button and look for the keys.
The keys are located on the far right. However as you do so, an emergency lockdown is put into place so have to override it.
Override the lockdown by going to Q's laptop in the middle of the room.
Interact with the laptop to start the override. Turret lasers will then activate to ward off the mercenaries. Stay close to the laptop to continue the hack.
After hacking the override, run to the garage where the Valhalla awaits you.
Bond revs up the Valhalla and prepare to fight! The car is armed with all sorts of weapons but you'll only need the machineguns and missiles to deal with these guys.
For this part of this mission use your weapons to dispatch them until you trigger a cutscene.
Damien, armed with a missile launcher, shoots the machinery above you, trapping you underneath the rubble. Fortunately, you make a way out and continue your mission to stop him.


| Related Article |
|---|
| How to Get Dashboard Toy Collectible and Its Location |
[7] Defeat Damien
Exit the tunnels to begin your chase.
Chasing Damien is rather straightforward. Follow the tunnels until you see a railing. Climb up then go through the wooden barricade.
Keep going until you see a gap that you can get across by climbing the steel beam on the right.
Run to the other side then make a left. Climb the ledge marked with a yellow 'X'.
Keep going until you see Damien. As you're about to catch him, he closes a gate in front of you.
A small cutscene will play out. Once that's done, backtrack then climb the ledge on the left. Break through another wooden door and keep running.
Climb the ladder and go through the gate. Prepare yourself for the upcoming boss fight.


- Boss Fight Phase 1
Bond tries to shoot Damien up close but to no effect. Damien grabs Bond by the arm which leads to small hacking sequence. You'll immediately notice that your gadgets are useless because he has a jamming device. You need to complete a proximity hack before you can fight back. Keep your distance because he has a shotgun which can kill you in short range.

Use the Environment
Damien is invulnerable to bullets in his exosuit so use the objects around you against him.

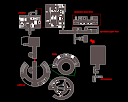
| Object | Image |
|---|---|
| Oil Barrel |  Hack the oil barrel or shoot it. Hack the oil barrel or shoot it. |
| Pumping System |  Hack the pumping system to trigger an explosion Hack the pumping system to trigger an explosion |
| Oil System |  Hack it to trigger an oil spill. Shoot the oil to trigger an explosion Hack it to trigger an oil spill. Shoot the oil to trigger an explosion |
| Gas Pipe |  Hack the gas pipe to trigger an explosion. Hack the gas pipe to trigger an explosion. |
Do this two more times until he's down. Once he's staggered run at him. A cutscene will play where Bond and Damien begin brawling until they fall into the tunnels.

- Boss Fight Phase 2
When they drop to the tunnels, Bond spots numerous bombs rigged to blow up the tunnels and drown MI6.

Use the Sentry Guns Against Him
Damien has set up numerous turrets that will fire in the direction that he's firing. You need to hack the currents to bring them under your control.

Reach the turret and override it
Run to your left and immediately down the stairs.
Press the button before running to the catwalk. The button will raise a few steel gate which will act as cover. Keep running until you see two paths.
Take the left path as it is covered by walls.
Traverse the pipes then climb down the ledge.
Use the alarm as a distraction by hacking it. There's also a steam pipe that can also act as cover if you hack it.
Run to the improvised lift and run to the sentry turret.
Bond says that he can't hack the suit but he can override the turrets.
Once you override the turret, start shooting Damien as he'll take considerable amount of damage from the turrent. Damien then detonates the first turret so you have to do it one more time


Override the second turret
Hack the alarm before making your way down the stairs.
Climb the platform and go through the wooden barricade. Jump over the ledge until you reach the other side.
The way ahead is blocked. Hack the alarm so Damien can shoot the explosives and clear a path for you.
Jump down and override the turret.
With the turret under your control, fire at Damien. A cutscene will play out.


- Last Phase
Damien detonates the bombs and they both fall to the lower levels. MI6 begins to flood but Bond, undeterred, is committed to stopping Damien once and for all. The final phase just involves a minigame so press the prompts on the screen as required.
The fight ends with Bond pushing himself and Damien into the water.
Damien drowns in the process but before Bond could suffer the same fate, Isola rescues him while stealing THEIA's core in the process.


Sometime later, M and Bond visit Greenway's grave to mark their respects. M then inducts Bond into the program as "001". Bond however thinks that since he's the 7th recruit "007" would be better.
Bond, now dubbed as "007", vows to track down Isola, recover the core and find out whom she works for.


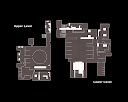
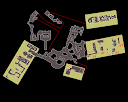
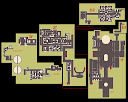
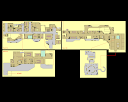
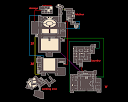
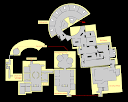
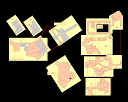
MI6 (For England) Interactive Map

List of All Mission Walkthroughs

| All Mission Walkthroughs | ||
|---|---|---|
| Against All Odds | The Needle's Eye | A Night Out |
| All the Time in the World | The Past Never Dies | Beyond the Grave |
| Uninvited | Knightfall | Time to Die |
| Wave of the Future | For England |
 |
|---|
| 007 First Light Complete Walkthroughs and Map Guides |