A Night Out Summary

While on a night out with his fellow trainees, Bond and the others are sent on a mission by MI6 to find a potential leaker of information. Bond is assigned to Joshua Pike, who is in an area restricted by a guest list. Some way or another, Bond is able to get close to Pike and hack his phone.
After the successful mission, M calls the recruits to MI6. She's suspending exams to send them on a new task. Rouge agent, the former 009, is coming in from the cold.
| Previous Mission | Next Mission |
|---|---|
| The Needle's Eye | All the Time in the World |
A Night Out Walkthrough
[1] Find the contact.
The trainees go out drinking in a club. They're celebrating the free time when MI6 sends them a mission.

Go to the bar to find the contact in red. Note that you can meet the wrong person as there are some other people in red at the bar. Bond will find them with a phrase. The contact will tell them something is waiting for them in the men's room.


[2] Get the pickup.
Head to the men's toilet and go inside the cubicle with an 'X' on the door. Retrieve the tablet. Moneypenny informs you of a target called Joshua Pike.

[3] Find a way upstairs.
After exiting the cubicle, the jealous boyfriend turns up. Give him a lesson.

Singh informs you that Pike is found in an invite-only area. There are two ways of getting to the upstairs lounge:

- Get the stamp that lets you go upstairs directly
- Use the route that is behind the bar (staff-restricted).
- Use the balcony above the dancefloor.

These different methods of doing a task are called an Opportunity. These can be tracked using the main menu.
-
The Stamp:
Eavesdrop on the girl. In her conversation, she will say that you can get a stamp for upstairs by using the passcode "Jones".

Head to the coat check and tell the attendant your name is "Jones" and they will stamp you.

-
Dancefloor Balcony:
You can get the Ober of Bells Collectible through this opportunity.
Listen in to the conversation of someone climbing to the dancefloor using the light rig.

Head to the band/DJ area's left side. Use the Phone Dart to make the staff sick. Once the staff passes you, head to the back of the set-up.

Start climbing at the back of the light rig. Make your way to the top and head to the dancefloor balcony.

| Related Article |
|---|
| How to Get Ober of Bells Collectible and Its Location |
-
Staff Entrance:
*You can get the Cocktail Napkin Collectible through this opportunity.
Head to the bar and use the Phone Dart to make the bartender sick. They will enter the staff room, giving you access to it. This is best done without interacting with them first, else another bartender will show up while they initially guard the entrance. You can also lie to them to get access to the rest of the bar.

| Related Article |
|---|
| How to Get Cocktail Napkin Collectible and Its Location |
Just sneak behind the cook in the kitchen and get to the other side. Voila, you're on the staircase en route to the dancefloor.
[4] Investigate Joshua Pike.
Look for Pike. You can use your Q-Lens to look for Pike's phone.
Stay close to Pike to make sure the hacking is completed. He will move to an even more exclusive area and you have to find a way inside as well.

You'll be stopped by the girl in red. Either play along or reject her.

Here are some more opportunities:
-
Disguise as a waiter
Pick up a tray to disguise yourself as a waiter to bypass the guard. You'll be stopped by some clubbers but fortunately, you're near enough to Pike that the hacking can continue while the conversation goes on.

-
Sneak behind using the Staff Room

Enter the Staff Room and move into the room to the right. Vault over the pile of boxes on the side and you'll find yourself just behind the wire fencing near Pike.
-
Make the bouncer sick
Use the Dart Phone to make the bouncer sick and just stride your way to the exclusive booths.

[5] Meet Cressida at the balcony.
The rest of the team tells Bond and Cressida that Pike was meant to meet a contact about a leak. Fortunately, the contact doesn't know what Pike looks like. Monroe will intercept the contact while Bond is assigned to keep Pike occupied in the mean while.

[6] Trap Joshua Pike.
Go to the bar to eavesdrop on some staff members. They mention that the storage room door is broken and some of them keep getting stuck there.

Go inside the staff room to check the storage room out. Confirm its utility and start planning how to lure Joshua Pike in.

Joshua Pike can be found on the large dance floor. Bond will bluff he is the contact so that Pike will follow.

Lead Pike to the storage room and sabotage the door to keep him there.

[7] Meet Cressida by the stairs.
Meet Cressida at the staircase. The fellow trainees will say that the contact was told that Pike would be "tall, dark, and handsome". Unfortunately, Monroe fails the height requirement so it's up to Bond to meet her instead.

She's described as someone in a black dress. Go to the large room without any clubbers. She'll be at the corner by herself.

In the middle of trying to get her to contact her handler, the girl in red appears. Again. Choose any way to settle this. The important thing is to make sure the contact calls her handler.

[8] Get out of the club.
Get to the extraction point once you're done...uh, oh. This couple never stops haunting Bond. Go and fight him and his lackeys alongside Monroe! Greenway isn't happy with Bond, but when is he?

[9] Report to Q.
Monroe is waiting for you outside M's office. He's surprised that Greenway doesn't seem to trust Bond when he, too, missed the extraction deadline.

Walk with him to the elevator to get to the Q-Lab.

Once there, Monroe will discuss with Cressida on what their cover stories will be. Leave them to their own devices and head for Q-07.

Bond meets with Q, and learns he'll simply be a chauffer for this mission. Unfortunate.

[10] Go to Gadget Testing.
You can explore a bit more to enjoy the surrondings. You can also listen to Cressida and Monroe discuss more about their cover stories.

| Related Article |
|---|
| How to Get Dagger Shoes Collectible and Its Location |
Once you exit from the other entrance, just keep going forward until you see the Lab on your left.

[11] Talk to Q.
Q and Bridget will be discussing about the testing of gadgets. Approach Q so he can tell you which field gear needs testing.

[12] Test New Gadgets.
The first gadget to be tested is a camera that can be used to activate a loud shockwave that disorients opponents and does medim damage to armor. Don't worry about Arthur, he's good with it!

The second gadget to be tested is a smoke grenade shaped like a lighter. It releases smoke very quickly, blinding those in the vicinity and leaving them vulnerable to attack while the smoke is there.

[13] Select Gadget Load-Out.
Once you're done testing the gadgets, approach Bridget at the Gadget Cart to pick two gadgets for the next mission. You're required to have the Q-Lens, and can pick the Dart Phone alongside the two gadgets you've just tested.

[14] Go to Operations.
Exit the lab and head back to the Elevator to get to Operations.

Once you get off the elevator, Bancroft will tell you that Moneypenny is at her pod.

| Related Article |
|---|
| How to Get Arrowhead Report Collectible and Its Location |
[7] Go to Moneypenny's Pod.
Now go to the opposite direction to enter Moneypenny's Pod.

Moneypenny and Greenway are currently discussing about 009's smarts and how no one will see his endgame coming.

[9] Get briefing from Moneypenny.
Moneypenny will explain that 009 and Greenway used to work together.

| Related Article |
|---|
| How to Get 009 Profile Collectible and Its Location |
Approach Moneypenny and ask questions about 009 and your own ranking. Once that's done, you can ask about the mission briefing, ending the mission.

The next mission will be to track 009, who will be at Slovakia. He wants to meet in public during a chess grandmaster's match. Since the recruits are blank states, this will allow for them to track and surveil 009. Be as discreet as possible.

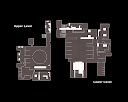
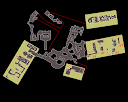
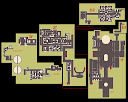
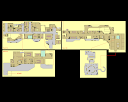
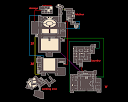
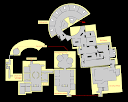
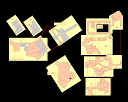
London (Arch Club) Interactive Map

List of All Mission Walkthroughs

| All Mission Walkthroughs | ||
|---|---|---|
| Against All Odds | The Needle's Eye | A Night Out |
| All the Time in the World | The Past Never Dies | Beyond the Grave |
| Uninvited | Knightfall | Time to Die |
| Wave of the Future | For England |
 |
|---|
| 007 First Light Complete Walkthroughs and Map Guides |