


Sealed Treasury Guide

Lost Chapter
Sealed Treasury
Sealed Treasury Quest Summary
The curiosity about the Sealed Treasury continues, but this time, there's an assassin to worry about.
Sealed Treasury Quest Condition
・Must have finished Throne and Tempest I
Sealed Treasury Walkthrough
[1] Check your mail.
・You're told to intercept the Assassin at the You Hour before they reach the Dragon Wall beneath the Sealed Treasury
[2] Head to the Vicinity of the Sealed Treasury.

Wait until You Hour of the next day. You can use the Time Function to change the time.
[3] Examine the Sealed Treasury.
・Jump on the roofs to check out what's going on
[4] Eavesdrop on the conversation inside.

Travel a bit forward and eavesdrop on the people again.

Seems like someone is skimming the national treasury.
[5] Find a way into the treasury.

Jump to the next roof and scout the area. The wanderer determines that the best bet to get in is by sneaking with the cargo.
Jump down and use the carts to avoid getting sighted. Use Wind Sense to see the visual reach the guards have. Continue in stealth onwards.
Here are some chests you might see during your stealth trip:


Jump up the shelves to get over the gate without being spotted.

Wait for the man to approach towards the gate. Start moving forward after he turns around. Turn to the right and use that path to get to the other gate.

Move forward to the left to overhear some more men milling around. Seems like the Censors are checking things. While pondering, the wanderer's token is taken by the assassin.
[6] Enter the Sealed Treasury

Hide in the latrine to avoid the soldiers. Take the official's clothes.

Make your way inside of the Sealed Treasury. Eavesdrop on the group of officials gathered at the front.
Here are the chests you can collect while you are here:
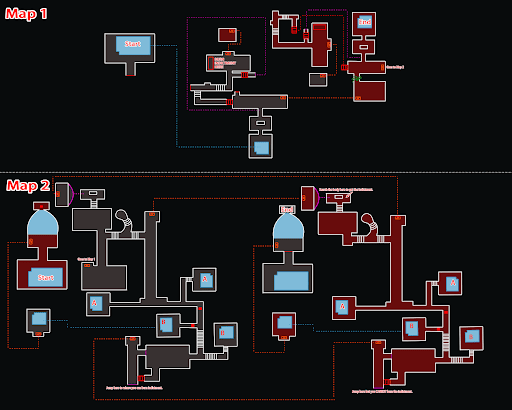
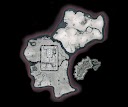
| Chest | Image | Map |
|---|---|---|
| Chest 1 |  |  2nd flr. |
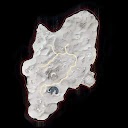
| Chest 2 |  |  3rd flr. balcony |
| Chest 3 |  |  3rd flr. balcony |
| Chest 4 |  |  3rd flr. balcony |
| Chest 5 |  |  3rd flr. balcony |

Examine the scattered ledgers.

Listen in on the fallen official.

Watch the pacing official and eavesdrop on his mutterings. Follow him.

Once the two of you are alone on the second floor, knock him out. Take the key from him.

Return to the first floor and look for the hidden entrance.
[7] Enter the Underground Treasury.

Climb down the entrance. The wanderer will hear cries from someone, yelling they are trapped. Go forward and find the minor clerk, tied up in an impossible-like knot. Use a knife to release them and talk to them.
He led the Censors downstairs and on his way back, someone in black apprehended him. In order to make sure he doesn't blab to the Imperial Service, the wanderer knocks him out.

Proceed to the other corridor and ride the mechanism to go down.
[8] Go after the assassin.

Go through the large doors and proceed further.
Here are the chests you can get from the Underground Treasury:


Jump down and talk to the Censor. He will tell the wanderer that Censor Xue is still further ahead and is dealing with something dangerous.

Proceed to explore further. The wanderer is attacked by the assassin and they fight with the wanderer gaining an advantage. The assassin then scurries off. Follow them.

The assassin explains that they're not after the treasure, but the life of a specific person. They then give a hint regarding on how to activate the mechanism leading to the inner rooms of the vault.

Climb up the stairs in the middle and jump on the roof tiles to reach the 2nd floor. You can also jump on the bookcase and jump towards the balcony.
To solve the puzzle, interact with both green pearls, The door shall open.

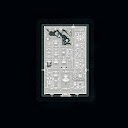
Enter the hidden hallway and then jump onto the eaves. Steal the map from the assassin and soon, a cutscene will begin.
A group of Censors are arguing with a palace attendant. From the conversation, it sounds like the emperor has been plundering his own treasury. The palace attendant reads out an imperial edict, saying that the treasury is ultimately here to sustain the people and the army through the war they are currently in.

The assassin interrupts, tossing the knot to the officials, saying to give it to the emperor because there's still at least one debt he has left to pay. They then push the wanderer to the ground while they make their escape.

Fed to the wolves, you have no choice but to escape on your own! Use the quick time events to jump over the soldiers and out of the gates!

Continue to escape with the quick time events.
[9] Catch up to the Black Rogue.

The soldiers are lost, but the wanderer still has a bone to pick with the Black Rogue! Chase after them.
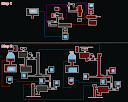
[10] Defeat the Black Rogue.

Phase 1:
・They key to this battle is a lot of deflection
・Fortunately, no golden attacks, but watch out for double red attacks
・Close-combat weapons recommended
| Move | Image | Description |
|---|---|---|
| Tearing through the Earth |  | Black Rogue's strike pierces through the ground. This is best dodged. |
| Charged Water Strike |  | Black Rogue charges before unleashing a water-based series of slashes. This can be deflected and dodged. |
| Slow Motion Water Strike |  | There will be some slow motion animation indicating the attack. This can be deflected. |
| Fast Strike |  | A red move. Can be easily deflected. |
| Consecutive Slashes |  | Black Rogue does several long-ranged slashes. They can be deflected, but are easier to dodge. |
| Kick Jump |  | From a distance, Black Rogue will kick you and do several attacks. This can be deflected but there are several consecutive attacks. |
| Close-Combat Consecutive Attacks |  | Black Rogue does a series of consecutive attacks, ending with a pierce attack. These can be deflected. |
| Double Sword Consecutive Attacks |  | The attack starts with a pierce attack, followed by slashes, and ends with a red attack.These attacks can all be deflected and dodged. |
| Air slashes |  | Black Rogue does several attacks while in the air. These can be deflected but there are many of them. |
| Double red |  | After deflecting the attack once, you must deflect a second time during a brief animation. |
Phase 2:
・Only one golden attack and it's easy to dodge
・Still a lot of deflection is needed
・The enemy has more range this time around, both long-ranged and short-ranged weapons can be used
| Move | Image | Description |
|---|---|---|
| Charged long-ranged slashes |  | Black Rogue charges and gives off consecutive slashes from afar. |
| Spin Attack |  | Black Rogue does a full turn to land a large attack. Can be deflected. |
| Close-combat Strikes |  | Consecutive close-ranged attacks. Can be deflected. |
| Water-edged Strikes |  | The range of the sword is extended with a blade made of water. Consecutive strikes are done. They can be deflected, but there are many attacks. |
| Consecutive attacks |  | Series of consecutive sword slashes. Can be deflected. |
| Jump Attack |  | Black Rogue jumps before doing a red attack. Deflect the red attack. |
| Water Strikes |  | Long-distance water attacks followed by a water-edged red attack. Initial attacks can only be dodged. The attacks after can be deflected. |
| Air slashes |  | Black Rogue does several attacks while in the air. These can be deflected but there are many of them. |
| Sword Shower |  | Golden attack. Black Rogue will go to the center of the roof and summon swords to rain down an area. Can be easily dodged. |
Sealed Treasury Rewards
・Lingering Melody x 1
・Medicinal Tales x 1
・Mystic Insight Pill x 1
・Slipped Letter x 1
・A Thousand Miles x 1
・Feud Knot x 1
・Oscillating Jade x 5
・Echo Jade x 55
・Imperial Palace Exploration x 158
・Enlightenment Points x 1500
・Character EXP x 60000
・Coin x 60000