


Confinement Tower Guide

Lost Chapter
Shengping Tower
Confinement Tower Quest Summary
The wanderer and Big Zhao are caught up in a massive illusion by the flute player.
Confinement Tower Quest Condition
Unlocked after reaching Kaifeng Imperial Palace during the "Throne and Tempest I" Quest.
Confinement Tower Walkthrough
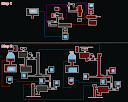
[1] Explore the unknown area.

The wanderer wakes up in a strange place with a talking tiger that claims to be Big Zhao. This is one heck of an illusion! Press forward and look around. Follow Big Zhao's lead.
There are many chests that can be found in this tower. Check the list right below to find them all!
List of chests:
| Chest | Image |
|---|---|
| After the first corridor |  |
| To the right of the first staircase |  |
| After climbing the ladder, follow Big Zhao |  |
| On the left side of the dragon statue |  |
| In the 2nd room of the hidden room behind the dragon statue |  |
| First right turn in the corridor the dragon statue opens |  |
| After jumping across the corridor platforms, turn left |  |
| Inside the second opening in the first area while controlling Big Zhao for the second time |  |
| Near the exit of the first area while controlling Big Zhao for the second time |  |
| At the end of the narrow passageway while controlling Big Zhao for the second time |  |
| Near the 2nd melody |  |
| Upon entering the central tower |  |
| Beside the entrance to the next room on the lowest floor |  |
| Upon opening the 3rd secret corridor |  |
[2] Find the way out of the dead end.

The wanderer and Big Zhao reach a dead end. Check the hanging ladder and the narrow gap to check for a way out.

Talking it out with Big Zhao, the wanderer suggests that Big Zhao goes through the narrow passageway in order to lower the ladder down.
You will now gain control of Big Zhao. Go underneath the boxes and start jumping your way up the boxes.

You will regain control of the wanderer. Go up the ladder and join Big Zhao. Follow them to the next area.
[3] Restore the missing piece to the statue.
There's a large statue that looks like a dragon on top of the Sealed Treasury. The flute player must be calling the Emperor a hoarder. Big Zhao notices that the statue has a missing part. Look for the missing piece.

Check the back of the room. Turn on the switch on the upper left-hand corner of the small doors.

Enter the hidden room and investigate the letter box and the table. Explore deeper and proceed to the connected room.

A shadow play begins. It depicts Commander Wang Yansheng talking to a shopkeeper. He wants to buy something but everything has been bought by Chancellor Wang Pu. They decide to visit the chancellor. Go behind the screen and check the letter on the ground.

Another shadow play starts. The shopkeeper from before warns Chancellor Wang of the commander's intentions. They seemed concerned that many are after Wang Pu's life. Wang Pu asks if they would be able to get rid of the threats on his life. The shopkeeper says he can try, for the right price. Wang Pu starts to mention that there is something in the palace...
You will now be given the chance to tamper the letter. The letter the wanderer picks up states that in order to provision the armies in pursuit of reclaiming Yanyun, the Emperor established the Sealed Treasury. Choose to hide the first sentence, concealing the main reason for creating the Sealed Treasury. Return the letter to the letter box in the previous room.

Open the new letter box. Set the key into the statue outside.
[4] Go through the new corridor.

Go through the new corridor. It will turn into an area with gaps going to the other side. Step on the switches near the railing to trigger a talk with Big Zhao. Big Zhao will step on the right switch - go and jump across the platforms. Make sure to wait for Big Zhao to activate the platforms before jumping! You cannot jump more than once in this area.
Once across, step on the left switch first, then the right switch, so that Big Zhao can get across.
[5] Find a way to the next area.

Press on forward and scout for a path. Go and join Big Zhao and ask about his discovery. Seems like there's another small gap that only Big Zhao can go through! Gain control of the tiger and enter the small opening.
Press switches as needed. Make sure to look if there are entrances in the walls! At first glance, they may look like dead ends. Don't worry, there's not much puzzling here. Just press all the switches.

Jump across the new platforms to get to the next area.
[6] Find the key to the statue.

A new statue appears with a man holding several different weapons. Go to the back of the room and open the mechanism by pressing on both the lower and upper left-hand corner switches.

Inspect the music box in the new room. Listen to the three melodies to figure out the score for the guqin.
| Area | Image |
|---|---|
| 1st melody Right of the main room |  |
| 2nd melody Behind the screen |  |
| 3rd melody Left of the main room |  |
You will need to play: Medium 6-High 5-High 6-High 5-High 3

A vision of a guqin player talking to an old general will start. The old general seems content with his life and having his sword been part of ending the war, but the guqin player wonders why he stays shut in.
Next, you see Liu Liang berating the guqin player for playing a battle theme. he seems to have been the one who gave Liu Liang the idea of stealing from the vault.
You then see commoners gossiping that the Emperor is stealing coin from the people.

The music box then opens, containing the key to the statue. Go back to the statue and set it there.
[7] Travel through the center tower.

Enter the central tower and reach its lowest floor. Enter the door and cross over the bridge.
[8] Find the key to the statue.

The statue depicts people in strife during a war and reminds Big Zhao of his time as a soldier, wondering why wickedness always seemed to win. Go to the back of the room and activate the door mechanism by pressing on the switches on the upper left and right-hand corner of the doors.

View the steamed bun on the left side after climbing up the stairs. A cutscene begins with thieves gathered around, talking about "The Reach" spreading rumours about the Sealed Treasury. He apparently wants the Emperor to open up the vault so that the money can be distributed to the starving people.

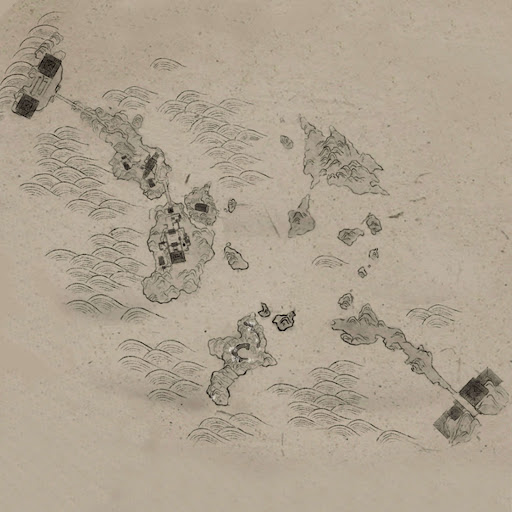
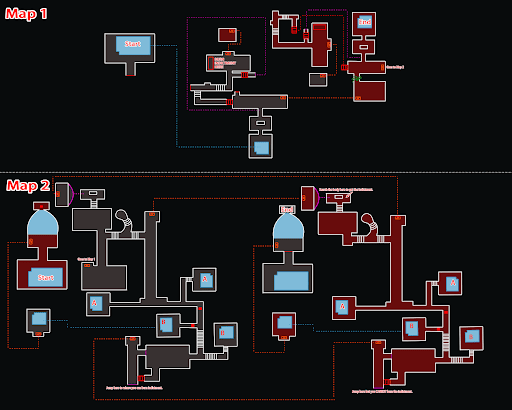
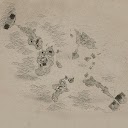
Examine the sheet of paper on the second level. The cutscene starts with them talking about the sheet of paper being a draft of the map of the palace. Click on the red circles to hear more about the infiltration plan. The Reach seems to know a lot about secret gaps in the palace, as well as the rotation of the guards. The thieves seem willing but one of them wants to consult the heavens before moving forward with the plan.

On the top level, inspect the fortune shaker. The cutscene goes back to the thieves. The Reach is prepared with what seems to be something for telling fortune. He shakes it and gets Fire above, Heaven below. It's a great blessing but with a vicious fire.
The wanderer discovers the needle used for the attack beside the fortune shaker. They realize that this was all an elaborate assassination attempt. Return to the statue and set the needle.
[9] Find a way out.

An earthquake starts and the wanderer is separated from Big Zhao. They fall into the water but somehow end up in an upside down version of the whole area.
Here is the list of chests available in this area:
| Chest | Image |
|---|---|
| In the corridor |  |
| After jumping through the moving blocks |  |
| After jumping on structures |  |
| After crossing the falling bridge |  |
| Near the bottom while descending |  | |
| After going down the ramp |  |

Find a way out by jumping on the platform and continuing to the nearby corridor. Stay on the pathway, jumping on blocks to get around. Remember that you only have one jump!

Jump on the structures to make it to the other side. Turn left and proceed on the bridge. Use the quick time event to jump once it starts to break down.

Make your way downwards. Jump on the structures and go down the ramp. Walk on the tightrope to get back to the central tower.

Descend further down and examine the Caisson Ceiling. A cutscene will show the wanderer jumping into the stream of water.
[10] Investigate the area.
Here is the list of chests in the area.
| Chest | Image |
|---|---|
| After turning right on the first hallway |  |
| Inside the burning house |  |
| In the corridor full of soldiers |  |
| On the 2nd flr. after defeating Wang Yansheng. |  |
| On the third flr. of the house |  |
| On the upper floor of the 2nd house, turn right |  |
| On the upper floor of the 2nd house, turn left |  |
| Further into the balcony Use Celestial Seize to avoid being spotted |  |
| Even further into the balcony |  |

You find yourself in a new illusion filled with buildings and statues. There are soldiers as well that you can attack. Walk down the hallway and turn right.

Defeat the soldiers inside the room and check on the servant afterwards. They seem very sorry to their master. Continue on the path. Be wary that there are soldiers along the way.
[11] Defeat Wang Yansheng.

In the next house you see, be ready for a mini boss fight against Wang Yansheng.
・Most of his attacks can be deflected
・He's rather tanky so you have to rely on exhausting his qi through deflection
・He becomes more vulnerable after his red attacks are deflected
・Be wary of his spinning attack as they can be hefty if you don't deflect them the first time
[12] Continue on with the investigation.

Go to the 3rd floor of the house. You will see the echo of the general's son lament that his father did not run. It seems that he was part of the previous regime and holds some resentment against the current Zhao Emperor.

Jump towards the large statue from the window. Use the statue to get further up the building.

Some officials are resistant to the honoring of former general Han, but Zhao Pu calls out such impudence. Sneak into the room and turn left into the balcony. Get rid of soldiers, but only through the Touch of Death.

After getting past the soldiers, the wanderer comes across Zhao Pu talking to Zhao Kuangyin about his decision to posthumously honour Han Tong. Everyone seems to have doubts since Wang Yansheng was kept alive, but the emperor seems to have done so to keep the army in line.
He says no one is beyond being sacrificed for the sake of the dynasty. Zhao Pu accuses that he still lives with Jianghu rules, where he originated. Zhao Kuangyin says that if people have the power to take it from him, then let them come. But despite it all, he's trying to make sure that those with the sword do not hold all the strength.

Escape the area and play the quick time events. Han Wei will monologue throughout how he feels that the emperor's words are unfair. It's also implied that he had been disguised as the Zhao Pu talking to Zhao Kuangyin earlier.
[13] Catch up with Han Wei.

You will arrive behind the echo of Han Wei in front of a large golden door. He wishes that Zhao Kuangyin was a straight up villain so that he would know what to do.
Catch up with Han Wei and read his final words.
[14] Defeat The Lone Tyrant.

Here are some general tips against this boss, as well as the moveset they use.
・They have several golden attacks
・They have no red attacks, but a lot of their attacks after golden ones can be deflected
・They are quick to do combos of their moveset
・A long-ranged weapon provides more time to dodge several of its attacks but a short-ranged weapon helps in deflecting and chipping away qi
・While deflecting is not obvious, as the boss is quite bulky, reducing qi is important for dealing damage overall
・The short-ranged weapon is more recommended as reducing qi should be the top priority
| Move | Image | Description |
|---|---|---|
| Golden Wall |  | Three sets of walls will come towards you. You can evade through the gap in the middle or through the side. You can also also avoid this if you are far enough from the walls. |
| Golden pierce |  | A golden move where The Lone Tyrant does a large damage piercing attack. Hard to dodge if in close range. |
| Golden consecutive strikes |  | The boss charges before unleashing a long chain of consecutive golden attacks. If you don't dodge the first time, you will experience several attacks. The first attack can be deflected, but it will make it harder to evade the 2nd attack. |
| Spin attack |  | The boss does the two slashes before doing a golden attack where they spin around. While it's easy enough to avoid this attack, they may follow up with other attacks quickly so be vigilant. |
| Jump attack |  | The boss jumps to attack you. Then, if you evade to the left or right, they will use their chain to do multiple consecutive attacks in that direction. Evade backwards instead of moving left or right after the jump attack to avoid damage. |
| Quick jump attack | | They jump to where you are and do a 3-slash attack. |
| Vertical spin |  | The boss does 3 consecutive vertical spin attacks with the second one sending you up and the third one crashing you to the ground. Deflect the first hit and the rest are also deflected. |
Phase 2:
・Red attacks and far less golden attacks are present
・Attacks that can be deflected are much more obvious than the previous phase
・Attacks that come with several lasers in one wave can be deflected
・Like the 1st phase, the different moves can be done in quick succession
・When they get to half-HP, you have to do some quick time events to continue
| Move | Image | Description |
|---|---|---|
| Golden punch |  | The Lone Tyrant charges and unleashes a golden punch towards you Evade sideways. |
| Dragon punch |  | The boss uses a dragon to punch you at full force and attack again. Both attacks can be deflected. |
| Golden beatdown |  | This happens very fast. The boss will charge briefly and unleash a cutscene worth of attacks on you. You have to evade RIGHT AWAY as soon as you see the golden light. |
| Mid-air kicks |  | A series of mid-air kicks. These can be deflected. |
| Golden pulses |  | The attack starts with a golden pulse of ki towards you. The boss then sends more pulses and sends a large pulse at the end. The first pulse must be evaded but the last attack can be deflected. |
| Pack of punches |  | A series of punches that ends with a vertical spin attack. These can be deflected. |
| Ground slashes |  | The boss does a vertical spin attack before unleashing several slashes at the same time towards you. |
| Dragon pulses |  | With the dragon's power, the boss sends pulses of qi towards you. The pulses can be deflected. |
| Dragon slashes |  | With the dragon's power, the boss will attack you then send out a wave of several slashes. These slashes can be deflected. |
| Dragon ground slam | ![gif10] | A red attack while the boss is on the dragon. He will then slam down to where you are. Can be easily deflected or dodged. |
| Ground slam |  | They attack once before slamming down to the ground. This can be deflected, |
| Dragon laser |  | The boss' dragon unleashes a wide horizontal laser. Evade backwards to avoid. This can be deflected. |
[Dragon laser 2.0] | The boss' dragon unleashes a large laser on the ground nearby before attacking you with a red attack. The first part can be avoided by evading backwards. The second part can be deflected | |
| Dragon ground slam 2.0 |  | The boss makes the dragon attack you before attacking you with a ground slam. The first attack can be deflected. |
Confinement Tower Rewards
・Lingering Melody x 1
・Medicinal Tales x 1
・Mystic Insight Pill x 1
・Oscillating Jade x 5
・Echo Jade x 55
・Imperial Palace Exploration x 158
・Enlightenment Points x 1500
・Character EXP x 60000
・Coin x 60000